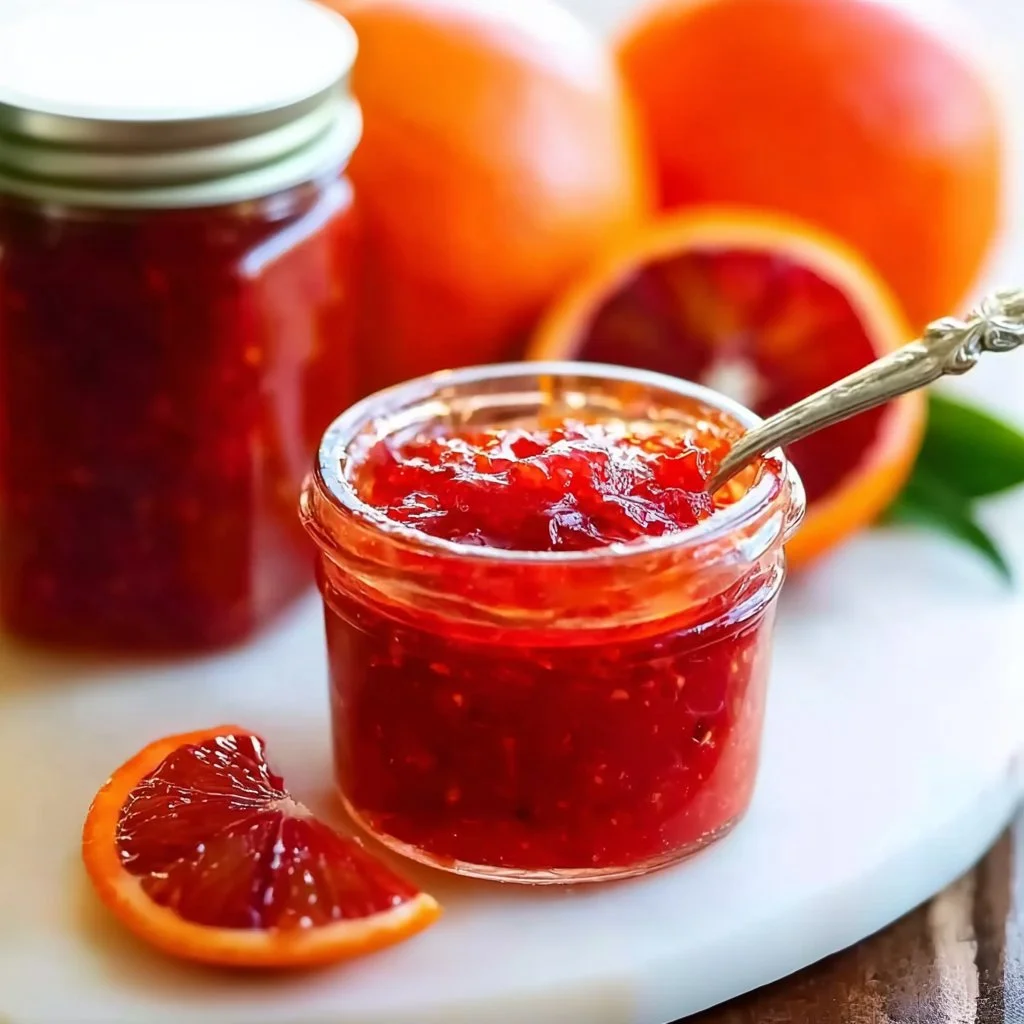
Embrace the Unique Flavor of Blood Orange Marmalade: A Heartfelt Recipe
Have you ever stood in your kitchen, frustrated with ordinary spreads that just don’t excite your taste buds? You’re not alone. Many of us crave something extraordinary, a burst of flavor that wakes up our morning toast or elevates our favorite desserts. Enter Blood Orange Marmalade—the sweet and tangy sidekick your breakfast never knew it needed. This rich, vibrant marmalade not only bursts with flavor, but it also brings a beautiful color and a touch of class to your meals.
In this post, I’ll walk you through my favorite recipe for Blood Orange Marmalade, sharing tips, tricks, and personal stories along the way. Let’s dive in!
The Joy of Discovering New Flavors
Just like many passionate home cooks, I’ve experienced my fair share of culinary woes. One particular Saturday morning, looking out at a pile of blood oranges on my kitchen counter, I felt a spark of inspiration. After a long week, I craved something delicious yet comforting. As I peeled and sliced into those juicy oranges, their vibrant color and aromatic zest created an enticing atmosphere in my kitchen, lifting my spirits and sparking creativity.
The process of making marmalade became more than just a recipe; it transformed into a joyful ritual. The blending of sweet and tart flavors mirrored the mix of challenges and triumphs I had faced throughout my week. That day, I learned that cooking is often a beautiful expression of our emotions—just like a Blood Orange Marmalade jar reflects the warmth we carry within us.
Living through that personal joy in the kitchen drives the essence of this dish, reminding us all that even the simplest of recipes can become soul-nourishing experiences. Dare I say, you’ll see your Blood Orange Marmalade emerge as your go-to spread, worthy of every meal?
If you’ve ever experienced cooking frustration, remember that cooking should be enjoyable! Check out my guide for quick breakfast sides to help you along.
Why Blood Orange Marmalade Shines
Blood oranges are not just beautiful; they offer a unique flavor profile that elevates any dish. Their vibrant hue and delightful sweetness combined with a hint of tanginess form a perfect base for marmalade. The distinct taste of blood oranges matters; it doesn’t just add novelty—it’s a flavor explosion that can redefine your palate. They are often sweeter than conventional oranges, and that sweetness brings harmony when combined with sugar and citrus pith.
Additionally, the high pectin content in blood orange peels will help your marmalade achieve a perfect set. The result? A deliciously thick spread that delights the senses and leaves you wanting more.
Quick Answer: The secret to perfect *Blood Orange Marmalade* is allowing the mixture to sit overnight before cooking, ensuring well-balanced flavors.
Investing a little time in this process pays off as you unlock a taste extraordinaire. Plus, this recipe calls for simple ingredients that are easy to source. For those returning to the kitchen to create this beautiful condiment, consider preparing a delightful Sweet and Sour Mix to accompany your new favorite meal.
Ingredients, Substitutions & Foolproof Steps
Creating your Blood Orange Marmalade involves just a handful of ingredients:
- Blood Oranges — the star of your dish; substitute with regular oranges for a milder flavor.
- Lemons — balances the sweetness; ensure they are juicy and aromatic.
- Sugar — essential for sweetening, but note that it can be substituted with honey for a twist.
- Water — helps to hydrate the mixture; no substitutes needed.
Directions/Steps:
- First work on the peel: Use a carrot peeler to take a thin layer of peel off the blood oranges and lemons. Avoid the pith—the whitish layer below the peel. You will use some of this later for pectin. Aim for 2 cups of blood orange peel and 1 cup of lemon peel.
- Slice the fruit and remove the seeds. Set aside any pith that comes off the fruit.
- Wrap the pith and seeds in cheesecloth and secure tightly.
- Use a food processor to break down the oranges and lemons. Pulse until in small bits. Expect it to be chunky; this will soften during cooking.
- Place the water, processed fruit, peels, and cheesecloth bundle into a large pot. Let this mixture sit overnight (not refrigerated). Remember: do not add sugar until Day Two.
- On the second day, bring the fruit mixture to a boil. Cook for 20-30 minutes until tender. Discard the cheesecloth bundle afterward.
- Measure the fruit and liquid. For each cup of fruit mixture, add 3/4 – 1 cup sugar.
- Bring to a boil again and stir until the sugar dissolves. Continue stirring as it reaches gelling point.
- Perform a gel test by placing a tablespoon on a cold plate. If it wrinkles when pushed, it’s ready.
- Ladle hot marmalade into prepared jars, leaving 1/4 inch headspace. Can it using a boiling-water canner, or refrigerate if you prefer not to seal.
Common Mistakes to Avoid:
- Not allowing the mixture to sit overnight will delay that beautiful flavor infusion.
- Skipping the gel test can lead to overly runny marmalade.
Pro Tips:
- Use the zest with the fruit for a bolder flavor.
- If you prefer a smoother marmalade, blend the mixture once cooked until desired consistency is reached.
Nutrition Highlights Table:
NutrientPer Serving Protein7g Carbs12g Fat6g If you’re looking for delightful accompaniment to your delicious Blood Orange Marmalade, check out my easy Italian Focaccia Bread Recipe.
Serving, Storage & Freezer Tips
How to Serve Blood Orange Marmalade
Serving your Blood Orange Marmalade is a treat! Spread it generously on toast, bagels, or pancakes. It can also enhance yogurt or smoothies, introducing an elevated taste.
How to Store Blood Orange Marmalade
After canning, your marmalade can last for up to a year in a cool, dark place. Once opened, keep it in the fridge and ideally consume within a month.
Can You Freeze Blood Orange Marmalade?
Absolutely! You can freeze your Blood Orange Marmalade. Just place it in an airtight container, leaving some headspace for expansion. It retains quality for up to six months and makes for a delightful surprise when pulled out mid-winter.
Reflecting on a favorite family recipe, I remember my grandmother’s marmalade. Every jar held an echo of laughter, warmth, and love—everything a cozy kitchen should embody.
FAQ Section
1. How long does Blood Orange Marmalade last in the fridge?
Homemade Blood Orange Marmalade can last 1 to 3 months in the fridge once opened, provided it’s sealed properly.
2. Can I use other citrus fruits besides blood oranges?
Yes, you can use common oranges, lemons, or even grapefruits; just remember each will modify the flavor profile uniquely.
3. What applications does Blood Orange Marmalade have beyond toast?
Try it as a glaze for meats, a filling in pastries, or blended into salad dressings for extra zest.
4. Can I make this recipe sugar-free?
Using natural sweeteners like agave or alternative sugar substitutes can yield different results, so expect slight variations in flavor and texture.
Conclusion
Creating a batch of Blood Orange Marmalade is not merely about the kitchen; it’s about your journey, your memories, and the stories that come to life on your plate. As you uncover the nuances of this vibrant spread, you’ll also find parts of yourself mirrored in the process. If this recipe reminds you of someone you love, don’t hesitate to share it with them. Your memories keep recipes alive.
You May Also Like:
- Peanut Butter Chicken Recipe: The Ultimate Comfort Food Dish
- Cinnamon Roll Cheesecake: Like a Pro
- Apple Pie Recipe: Classic Comfort
Let the sweet tang of Blood Orange Marmalade grace your meals, igniting joy and creativity once more!
Blood Orange Marmalade
Ingredients
Method
- Use a carrot peeler to take a thin layer of peel off the blood oranges and lemons. Aim for 2 cups of blood orange peel and 1 cup of lemon peel.
- Slice the fruit and remove the seeds. Set aside any pith that comes off the fruit.
- Wrap the pith and seeds in cheesecloth and secure tightly.
- Use a food processor to break down the oranges and lemons until in small bits.
- Place the water, processed fruit, peels, and cheesecloth bundle into a large pot. Let this mixture sit overnight (not refrigerated).
- On the second day, bring the fruit mixture to a boil. Cook for 20-30 minutes until tender. Discard the cheesecloth bundle afterward.
- Measure the fruit and liquid. For each cup of fruit mixture, add 3/4 - 1 cup sugar.
- Bring to a boil again and stir until the sugar dissolves. Continue stirring as it reaches gelling point.
- Perform a gel test by placing a tablespoon on a cold plate. If it wrinkles when pushed, it’s ready.
- Ladle hot marmalade into prepared jars, leaving 1/4 inch headspace. Can it using a boiling-water canner, or refrigerate if you prefer not to seal.