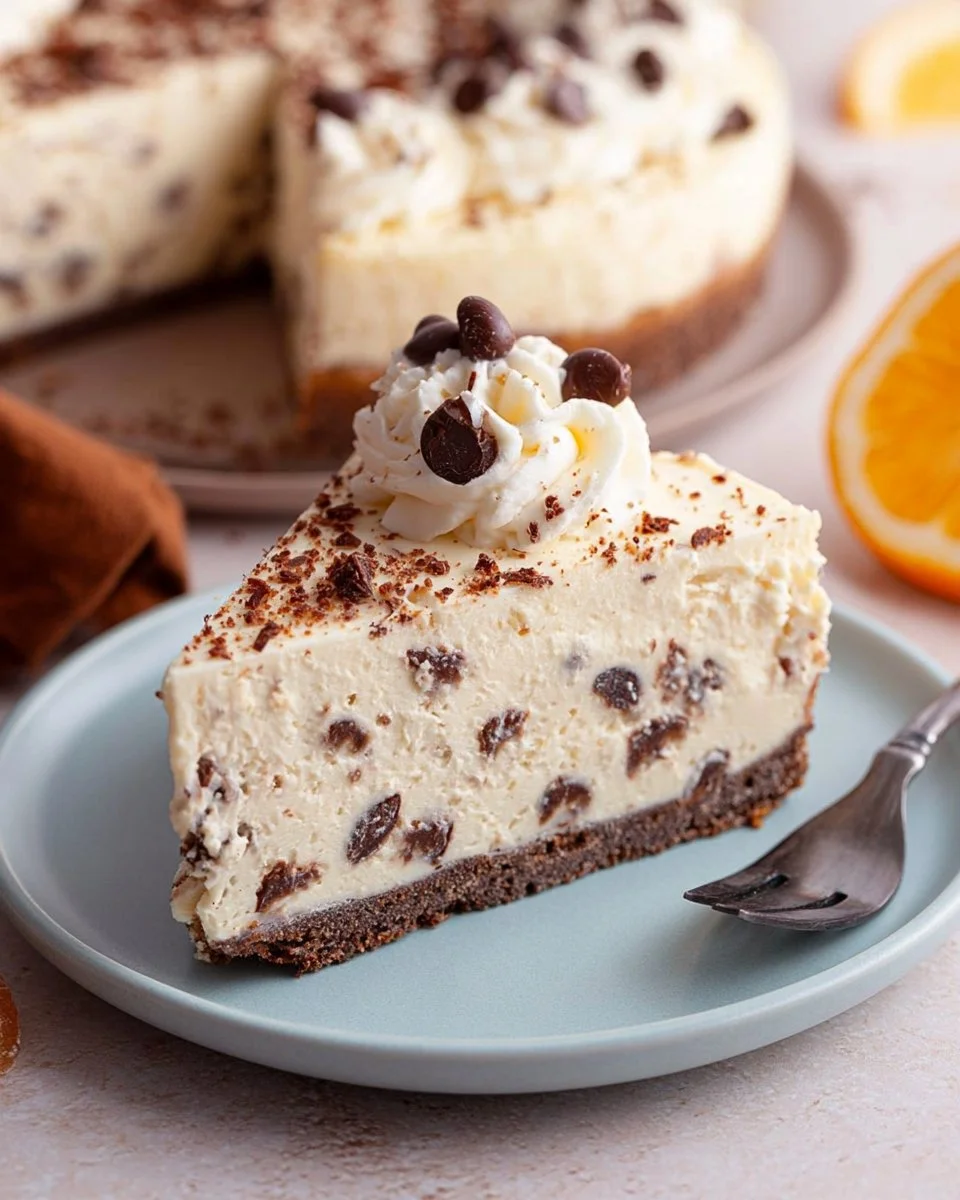
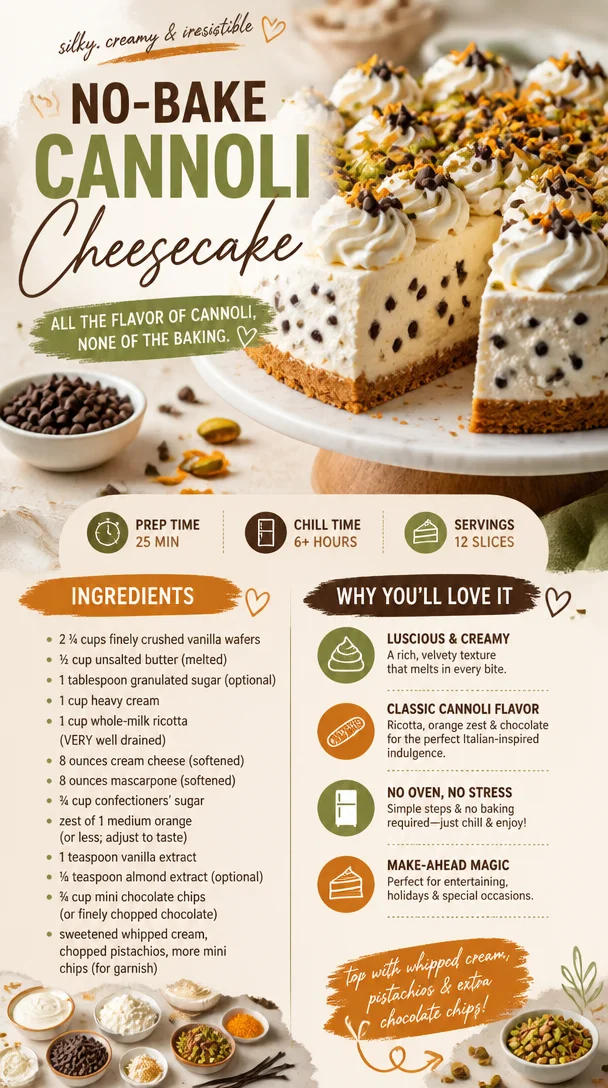
Indulging in a creamy dessert is one of life’s small luxuries, and there’s something undeniably magical about the harmonious marriage of rich flavors and delicate textures that a cheesecake offers. Imagine the satisfying crunch of a buttery crust giving way to a luxuriously smooth cream filling, balanced by hints of citrus and chocolate. This dessert speaks to the heart, making it perfect for family gatherings, celebrations, or just a well-deserved treat after a long day. With the richness of traditional Italian cannoli transformed into a no-bake cheesecake, you’ll discover a dessert that’s not only easy to make but also visually stunning — a true showstopper on any dessert table. This recipe allows you to indulge without the hassle of baking, making it a go-to for any home cook looking to impress without spending hours in the kitchen. Get ready to treat yourself and your loved ones to a delightful and refreshing dessert that’s as easy to prepare as it is delicious.
Why You’ll Love This Recipe
There’s an abundance of reasons to adore this no-bake cannoli cheesecake. For starters, it combines beloved flavors in a new and exciting way. Cannoli bring to mind a rich, creamy filling that dances on your palate, while the cheesecake offers a luscious texture that melts in your mouth. The best part? You can whip it up without turning on the oven, making it incredibly convenient, especially during hot summer months when you want to avoid heating your home. This recipe is also incredibly versatile. Whether you’re serving a crowd at a party or enjoying an intimate family dinner, this cheesecake will surely add a touch of elegance to any occasion. With its unique combination of textures—crunchy crust, creamy filling, and delightful toppings—each bite will leave you longing for more, making it a memorable dessert that’s sure to impress.
What Makes This Recipe Special
What sets this no-bake cannoli cheesecake apart from others is its simplicity combined with depth of flavor. The creamy filling incorporates whole-milk ricotta, mascarpone, and cream cheese, creating a rich base that rivals traditional Italian desserts. It’s also enhanced with a splash of vanilla extract and a zesty hint of orange, providing a refreshing lift that brightens every bite. This recipe allows you to adjust sweetness and flavor according to preference, making it highly customizable. The addition of mini chocolate chips gives a delightful pop of sweetness and texture, while the garnishes of whipped cream and chopped pistachios add visual appeal as well as an extra crunch. This dessert encapsulates the essence of indulgence while remaining straightforward enough for any home cook to master, ensuring it’s a crowd-pleaser every time.
Ingredients
vanilla wafers: These create the crust’s base, offering a sweet crunch.
unsalted butter: Binds the crumbs together for a rich, cohesive crust.
granulated sugar: Enhances sweetness in the crust, optional based on preference.
heavy cream: Whipped to provide volume and a light texture to the filling.
whole-milk ricotta: The star of the filling, lending creaminess and richness.
cream cheese: Adds smoothness and tanginess to enhance flavor.
mascarpone: Contributes an extra layer of creaminess and luxury.
confectioners’ sugar: Sweetens the filling for a delightful balance.
orange zest: Infuses a bright, citrus note that elevates the flavor profile.
vanilla extract: Adds a warm, aromatic essence to the dessert.
almond extract: A subtle, nutty flavor that enhances the overall taste, optional.
mini chocolate chips: Adds sweetness and texture, making each slice indulgent.
sweetened whipped cream: Garnish that adds a creamy, fluffy element on top.
chopped pistachios: A crunchy, colorful garnish for visual appeal and flavor.
more mini chips: Used for additional garnishing to enhance the dessert’s look.
How to Make No-Bake Cannoli Cheesecake
Phase 1 – Prep
STEP 1. Prepare the crust. Combine finely crushed vanilla wafers with melted unsalted butter and optional sugar.
STEP 2. Press the crust. Firmly press the mixture into the bottom of a springform pan, creating an even layer.
STEP 3. Chill the crust. Place the crust in the refrigerator to set while preparing the filling, about 30 minutes.
Phase 2 – Cook
STEP 4. Whip the cream. In a mixing bowl, whip heavy cream until stiff peaks form, then set aside.
STEP 5. Mix the filling. Beat together ricotta, cream cheese, mascarpone, and confectioners’ sugar until smooth and creamy.
STEP 6. Add flavors. Stir in orange zest, vanilla extract, and optional almond extract until evenly blended.
STEP 7. Fold in chocolate. Carefully fold in mini chocolate chips to avoid breaking them.
STEP 8. Combine with whipped cream. Gently fold the whipped cream into the cheese mixture until fully incorporated.
Phase 3 – Serve
STEP 9. Fill the crust. Spoon the cheesecake filling into the chilled crust, smoothing the top evenly.
STEP 10. Chill the cheesecake. Refrigerate for at least 4 hours or until firm, overnight for best results.
STEP 11. Garnish. Before serving, top with sweetened whipped cream, chopped pistachios, and additional mini chocolate chips.
Pro Tips
To elevate your no-bake cannoli cheesecake experience, ensure that your ricotta is extremely well-drained, as excess moisture can make the cheesecake soggy. When whipping your heavy cream, be cautious not to overbeat; stop once you reach stiff peaks for the perfect light texture. To add a layer of flavor, you could toast your vanilla wafers slightly before crushing them. You can also experiment with different chocolates, such as dark or white, for a unique twist. For an added touch of flair, consider incorporating a layer of chocolate ganache on top before garnishing. Lastly, when it comes to garnishing, fresh fruit, such as berries or citrus slices, can make your dessert not only beautiful but even more delicious.
Common Mistakes to Avoid
One common pitfall when making this dessert is overworking the filling once the whipped cream is added. This can lead to a dense texture instead of a light, airy cheesecake. Another mistake is using ricotta that hasn’t been drained well, which may create a runny filling. If you’re in a humid climate, be sure to keep your ingredients and the cheesecake stored in a cool place to maintain structure. Additionally, not allowing enough time for the cheesecake to chill can compromise its firmness, resulting in a less enjoyable experience. Always remember to use a good quality springform pan to simplify the removal and serving process without damaging the cheesecake. Finally, refrain from skipping the garnishes; they add essential flavors and a wonderful visual element.
Variations
• Substitute the vanilla wafers with graham crackers for a different crust flavor.
• Use different citrus zest, like lemon or lime, for a refreshing twist.
• Incorporate espresso or coffee flavors for a mocha cheesecake.
• Add crushed nuts to the crust for an extra crunch.
• Swap mini chocolate chips with crushed hard candies for a colorful surprise.
Serving Ideas
This cheesecake pairs wonderfully with a hot cup of coffee or a refreshing iced tea. For a festive presentation, serve slices on colorful dessert plates alongside drizzles of chocolate or caramel sauce. Consider topping each slice with a sprinkle of additional nuts or fresh berries for an added touch of color and texture. For gatherings, you might serve individual portions in cups for easy serving and a fun presentation. It’s also delightful alongside a fruit compote that complements the flavors of the cheesecake beautifully.
Meal Prep & Storage
This no-bake cannoli cheesecake can be prepared ahead of time, making it an excellent choice for busy schedules. After assembling it, cover it tightly with plastic wrap or foil and store it in the refrigerator. It can be kept for about 3 to 4 days, remaining delicious while well-sealed. If you wish to freeze it, slice it into portions, then wrap each piece individually in plastic wrap followed by aluminum foil to prevent freezer burn. Thaw in the fridge before serving. However, it’s best enjoyed within a month of freezing to ensure optimal flavor and texture. If you find you’ve made too much, sharable options or gifting some to friends can spread the joy of your culinary creation.
FAQs
1. Can I use a premade crust?
Absolutely! A premade crust can save time and make the process even easier. Just ensure it’s a flavor that complements the cheesecake filling.
2. How long does this cheesecake need to chill?
For best results, chill the cheesecake for at least four hours, but overnight chilling is ideal for achieving a firm texture.
3. Can I use low-fat ingredients?
While you can substitute low-fat options, it may alter the taste and texture. Full-fat options provide the best creamy richness.
4. How do I know when my cheesecake is set?
The cheesecake should be firm to the touch and hold its shape when sliced but still has a slight creaminess to it.
5. Is it possible to make this cheesecake vegan?
Yes, you can use plant-based alternatives for cream cheese, mascarpone, and whipped cream to create a vegan version of this dessert. Just ensure the ingredients you select are labeled as vegan.
Conclusion
This no-bake cannoli cheesecake is a delightful fusion of classic Italian flavors and modern convenience, providing a show-stopping dessert that everyone will love. Quick to prepare and wonderfully creamy, it makes both casual and special occasions memorable. With the ability to customize and adapt to your tastes, it’s a dessert that promises satisfaction time and again. Indulge in this easy homemade recipe and treat yourself to a slice of happiness!

No-Bake Cannoli Cheesecake
Ingredients
Method
- Prepare the crust. Combine finely crushed vanilla wafers with melted unsalted butter and optional sugar.
- Press the crust. Firmly press the mixture into the bottom of a springform pan, creating an even layer.
- Chill the crust. Place the crust in the refrigerator to set while preparing the filling, about 30 minutes.
- Whip the cream. In a mixing bowl, whip heavy cream until stiff peaks form, then set aside.
- Mix the filling. Beat together ricotta, cream cheese, mascarpone, and confectioners' sugar until smooth and creamy.
- Add flavors. Stir in orange zest, vanilla extract, and optional almond extract until evenly blended.
- Fold in chocolate. Carefully fold in mini chocolate chips to avoid breaking them.
- Combine with whipped cream. Gently fold the whipped cream into the cheese mixture until fully incorporated.
- Fill the crust. Spoon the cheesecake filling into the chilled crust, smoothing the top evenly.
- Chill the cheesecake. Refrigerate for at least 4 hours or until firm, overnight for best results.
- Garnish. Before serving, top with sweetened whipped cream, chopped pistachios, and additional mini chocolate chips.