No-Knead Overnight Sandwich Rolls
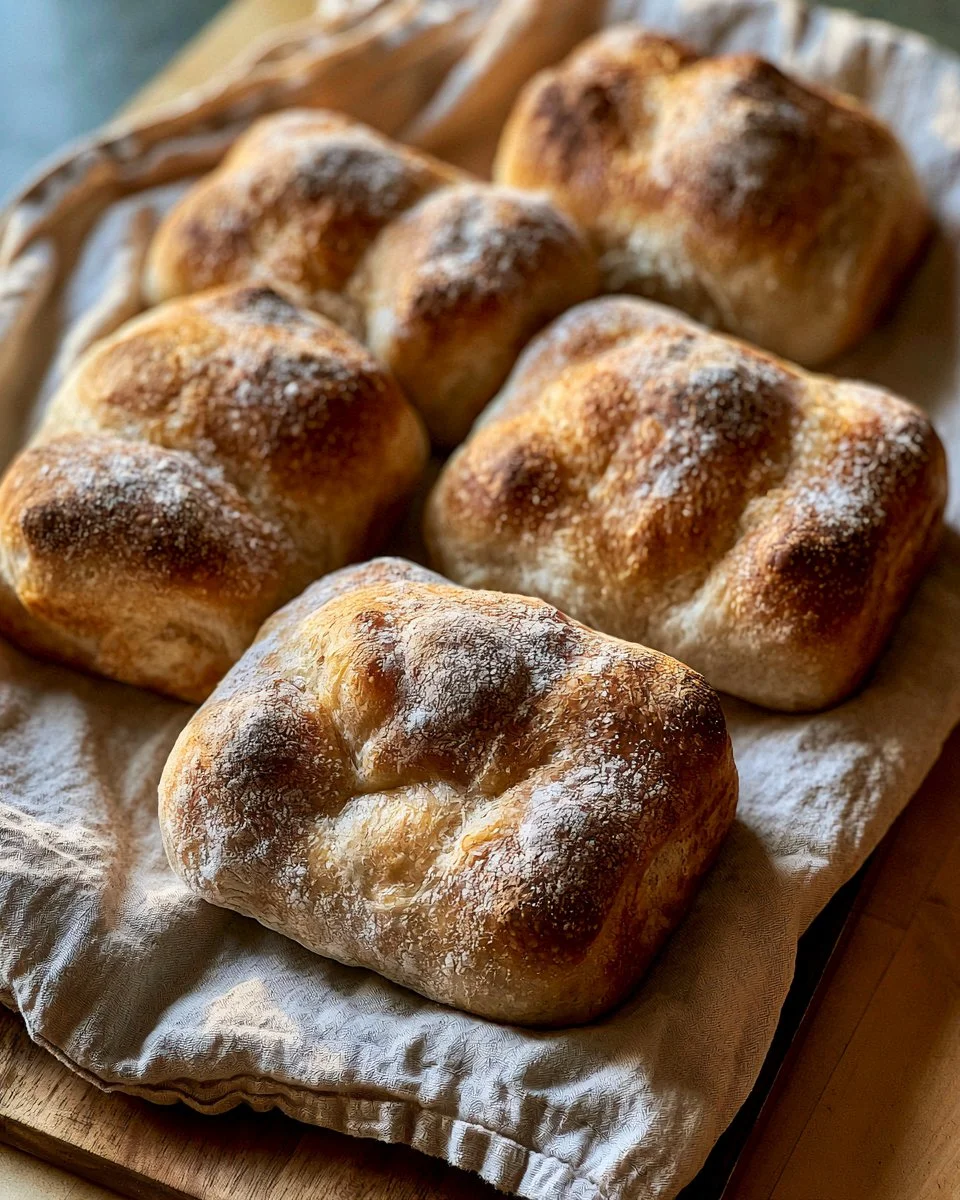
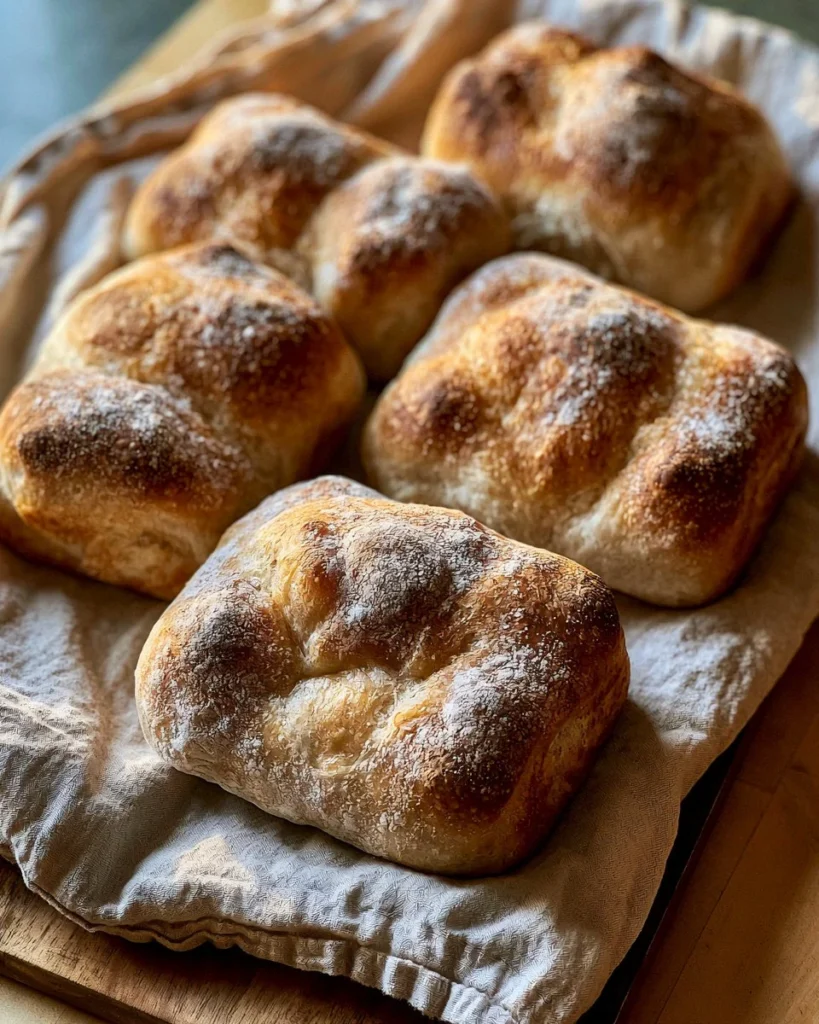
Imagine waking up to the warm aroma of freshly baked sandwich rolls that require no kneading! This is the magic of no-knead overnight sandwich rolls, a simple yet gratifying addition to your breakfast spread or lunch box. These rolls are delightfully airy with a crust that is both crispy and golden brown, making them perfect for sandwiches or simply enjoyed with a pat of butter. Their texture strikes a balance between tender and chewy, ensuring each bite is satisfying. With a little planning, you can have these homemade rolls ready in no time, turning an ordinary day into something extraordinary. Who could resist soft, fluffy goodness right from your own kitchen?
Quick Answer
This recipe yields delightful, fluffy sandwich rolls without any kneading, making it an effortless baking option!
Why You’ll Love This Recipe
Making no-knead overnight sandwich rolls is not only easy but also incredibly rewarding. Here are some reasons you’ll love this recipe:
- Effortless Preparation – Just mix, rise, and bake!
- Time-Saving – The dough rises overnight, so it’s ready whenever you are.
- Versatile Use – Perfect for sandwiches, sliders, or even toasting.
- Crispy Crust – Enjoy a golden, crunchy outer layer.
- Fluffy Texture – Soft and airy inside, the rolls will have everyone coming back for more.
- Minimal Equipment – You don’t need a stand mixer or a lot of specialized tools.
What Makes This Recipe Special
This no-knead overnight sandwich roll recipe stands out due to its unique method of allowing the dough to develop flavor over an extended period without the need for intensive manual labor. The long fermentation time enhances the flavor profile, making the rolls richer and more complex. Additionally, the use of cold water prolongs fermentation, allowing for a light, airy crumb that distinguishes these rolls from conventional ones. The careful mixing and folding technique not only contribute to texture but also create a bubbly, irregular crumb structure that’s highly desirable. Each element works together harmoniously to produce rolls that are genuinely special.
Kitchen Tools You’ll Need
- Large Bowl – For mixing the dough and allowing it to rise.
- Rubber Spatula – For mixing and folding the dough.
- Knife or Dough Scraper – Ideal for dividing the dough.
- Floured Surface – To shape the rolls without sticking.
- Sheet Pan – To bake the rolls on.
- Parchment Paper or Silpat – For lining your baking sheet.
Ingredients
unbleached bread or all-purpose flour: Provides structure and chewiness to the rolls.
kosher salt: Enhances flavor and controls fermentation.
instant yeast: Helps the dough rise, creating airy pockets within the rolls.
cold water: Hydrates the flour and supports gluten development without requiring kneading.
additional flour: Needed for shaping the rolls, preventing sticking to surfaces.
Ready to cook? Scroll to the recipe card below for exact measurements.
How to Make No-Knead Overnight Sandwich Rolls
Phase 1 – Prep
STEP 1. Combine Dry Ingredients. In a large bowl, whisk together the flour, salt, and instant yeast.
STEP 2. Add Water. Add the water and, using a rubber spatula, mix until the liquid has absorbed and you have a sticky dough ball.
STEP 3. Rest the Dough. Cover the bowl and let it rest for 30 minutes, then stretch and fold the dough if time allows.
STEP 4. Stretch and Fold. Fill a small bowl with water; wet your hand and grab an edge of the dough, pulling it up and towards the center, repeating this 8 to 10 times.
STEP 5. Let It Rise. Cover the bowl again with a tea towel and let it rise at room temperature overnight or for up to 12 hours.
Phase 2 – Cook
STEP 6. Prepare for Shaping. The next morning, sprinkle 1/4 cup of flour over a work surface.
STEP 7. Turn Out Dough. Turn the risen dough out onto the floured surface, using flour as needed to keep it from sticking.
STEP 8. Divide Dough. Divide the dough into 6 to 8 roughly equal portions, aiming for about 155 grams per portion for 6 rolls or 116 grams for 8 rolls.
STEP 9. Shape Rolls. Shape each portion into a ball, using flour on your hands and the work surface as necessary.
STEP 10. Transfer to Vessel. Place the shaped portions into a floured vessel for rising.
STEP 11. Let Them Rest. If time permits, allow the balls to rise for 2-3 hours until light to the touch.
STEP 12. Prepare for Baking. Line a sheet pan with parchment paper or a Silpat and preheat the oven to 475ºF.
STEP 13. Shape and Rest Rolls. Gently stretch each ball into a rectangle, place them on the sheet pan, and let them rest for 20 minutes.
Phase 3 – Serve
STEP 14. Bake the Rolls. Transfer the pan to the oven and bake for 15 minutes.
STEP 15. Cool Completely. Remove the pan and let the rolls cool completely on the pan before halving and using.
Why This Recipe Works
The texture of these rolls showcases a delightful balance between crusty and soft, achieved through a unique no-knead method that promotes natural fermentation. This approach not only enhances the flavor but also creates a complex layer of taste with each bite. The combination of moisture from the cold water and the air captured through the stretching technique helps build that tender, airy crumb you crave. Additionally, the high baking temperature creates a wonderful crust, locking in moisture and yielding rolls that are chewy yet light. The extended rise period allows the gluten to develop naturally, reinforcing the rolls’ structure while enhancing their flavor, making this recipe a standout choice for any bread lover.
Pro Tips
For perfect no-knead rolls, consider these pro tips:
- Use a kitchen scale for accurate dough portioning to achieve uniform rolls.
- Let the dough rise longer if your kitchen is cooler to develop more flavor.
- Agood surface for shaping allows you to work efficiently without excessive sticking.
- Ensure your oven is preheated properly to maintain the heat throughout the baking process.
- Experiment with different flours for a unique flavor profile, like whole wheat for added nuttiness.
Common Mistakes to Avoid
Be mindful of these common pitfalls:
Mistake: Not using enough water.
Why it happens: Inaccurate measurements can lead to dry dough.
How to fix it: Add a small amount of water to achieve the desired sticky consistency.
Mistake: Skipping the stretching and folding step.
Why it happens: Time constraints or oversight.
How to fix it: Make it a priority, as this step enhances texture.
Mistake: Not covering the dough adequately during the rise.
Why it happens: Lack of proper tools.
How to fix it: Use a clean towel or plastic wrap to maintain moisture.
Variations
- Herbed Rolls – Add dried or fresh herbs to the dough for a fragrant twist.
- Cheddar Rolls – Incorporate shredded cheddar cheese for cheesy goodness.
- Sweet Rolls – Fold in some cinnamon and sugar for a sweet breakfast option.
- Garlic Rolls – Add minced garlic and parsley for a flavorful side.
Nutrition Highlights
| Nutrient | Role |
|---|---|
| Protein | Helps support satiety and balanced meals. |
| Fiber | Promotes digestive health and keeps you feeling full. |
| B Vitamins | Support energy metabolism, crucial for everyday well-being. |
| Complex Carbohydrates | Provides sustained energy for active lifestyles. |
Serving Ideas
These sandwich rolls are incredibly versatile. Serve them warm with butter as part of a cozy breakfast or brunch spread. Use them for hearty sandwiches filled with delicious fillings like turkey, avocado, or classic deli meats. They also make a fantastic base for sliders, perfect for parties, and family gatherings. You can even toast them for extra texture, making them an excellent choice when paired with soups or stews.
Best Occasions for This Recipe
This recipe is ideal for various occasions—from casual family dinners and festive gatherings to meal prep on a busy weeknight. They’re an excellent choice for a comforting homemade addition to holiday feasts or picnics in the park. Anytime you want to enjoy fresh bread without the fuss, these no-knead overnight sandwich rolls are the way to go!
Meal Prep & Storage
Meal Prep
Preparing these rolls ahead of time means you can have fresh bread whenever you need it. You can shape the rolls in advance and refrigerate them until you’re ready to bake, allowing for quick fresh rolls in the morning.
Refrigeration
Once baked, you can store the rolls in an airtight container at room temperature for up to three days. If they become stale, you can easily revive them by warming them in an oven.
Freezing
For longer storage, freeze the rolls right after they have cooled completely. Place them in an airtight bag or container, where they will last for up to three months. To enjoy, simply thaw at room temperature or warm in the oven.
Reheating
Reheat your rolls in a preheated oven set to 350ºF for about 10 minutes or until warmed through to enjoy the freshly baked texture once again.

FAQs
How long do the rolls keep fresh?
The rolls will stay fresh for up to three days at room temperature stored in an airtight container.
Can I use whole wheat flour instead?
Yes, whole wheat flour can be used for a different flavor and more nutrition, but it may require slight adjustments in water content.
What if my dough isn’t sticky enough?
Simply add a bit more water until the dough reaches the desired sticky texture.
Can I make these rolls ahead of time?
Absolutely! The dough can be prepared the night before and baked the following day.
What should I do if my rolls come out too dense?
This may result from not enough water or not allowing the dough to rise sufficiently. Make sure to follow measurements accurately next time.
Save This Recipe for Later
If you enjoyed this no-knead sandwich roll recipe, don’t forget to save it for later! It’s a must-try for any bread enthusiast!
Conclusion
No-knead overnight sandwich rolls are an exquisite and practical addition to any meal. With just a little foresight, you can create flavorful and fluffy rolls that will impress family and friends alike. Whether paired with a hearty sandwich or enjoyed fresh from the oven, these rolls bring the warmth of home baking to your table with minimal effort. Try them out today and enjoy the delightful results!
No-Knead Overnight Sandwich Rolls
Ingredients
Method
- In a large bowl, whisk together the flour, salt, and instant yeast.
- Add the cold water and, using a rubber spatula, mix until the liquid has absorbed and you have a sticky dough ball.
- Cover the bowl and let it rest for 30 minutes, then stretch and fold the dough if time allows.
- Fill a small bowl with water; wet your hand and grab an edge of the dough, pulling it up and towards the center, repeating this 8 to 10 times.
- Cover the bowl again with a tea towel and let it rise at room temperature overnight or for up to 12 hours.
- The next morning, sprinkle 1/4 cup of flour over a work surface.
- Turn the risen dough out onto the floured surface, using flour as needed to keep it from sticking.
- Divide the dough into 6 to 8 roughly equal portions, aiming for about 155 grams per portion for 6 rolls or 116 grams for 8 rolls.
- Shape each portion into a ball, using flour on your hands and the work surface as necessary.
- Place the shaped portions into a floured vessel for rising.
- If time permits, allow the balls to rise for 2-3 hours until light to the touch.
- Line a sheet pan with parchment paper or a Silpat and preheat the oven to 475ºF.
- Gently stretch each ball into a rectangle, place them on the sheet pan, and let them rest for 20 minutes.
- Transfer the pan to the oven and bake for 15 minutes.
- Remove the pan and let the rolls cool completely on the pan before halving and using.