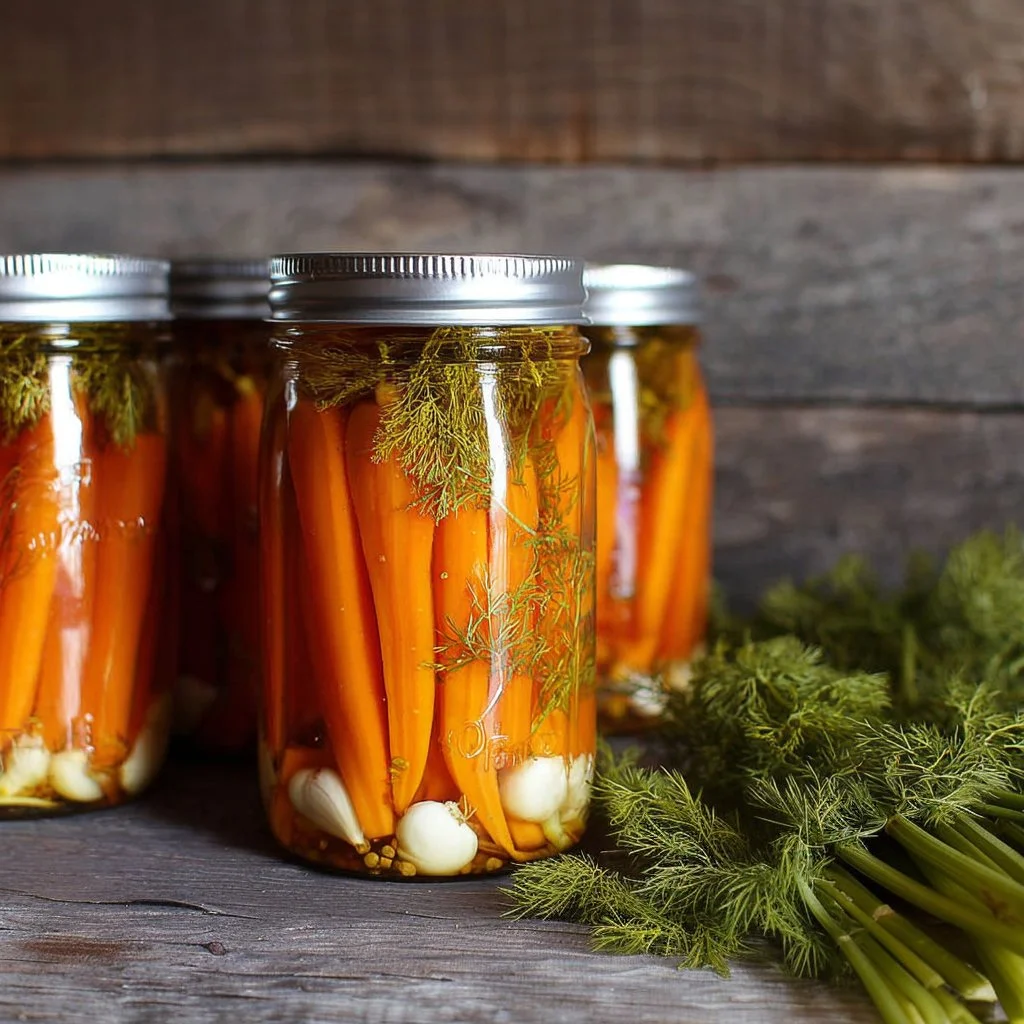
When it comes to preserving flavors that brighten up any meal, nothing quite compares to Pickled Carrots with Dill and Garlic. If you find yourself often disappointed by dull sides, this recipe will change your culinary landscape forever. Bursting with tangy garlic and the freshness of dill, pickled carrots are an easy addition to sandwiches, salads, and even charcuterie boards. As you embark on this journey of canning, you may also discover that you are not just preserving food but also family traditions.
The Struggle with Overwhelming Flavors
We’ve all been there: staring at an array of ingredients, feeling the mounting pressure to create something delicious, yet hoping not to overwhelm the palate. I remember my first attempt at pickling—sweaty palms and a shaky heart as I wondered if I dared delve into this old-fashioned practice. But it turned out to be a way of rekindling my grandmother’s spirit in my kitchen, a comforting reminder that so many before me have thrived in this culinary artscape.
As I maneuvered my way through her age-old recipe for Pickled Carrots with Dill and Garlic, a sense of nostalgia washed over me. Each step took me deeper into my family’s history, revealing tastes crafted by love and tradition.
Quick Background: My grandmother introduced me to food preservation when I was just a child, and I’ll never forget that summer afternoon in her kitchen where the air was thick with spices. Now, years later, I realize that preserving these recipes maintains our connection even among generations. Through these pickled carrots, I bring my loved ones together, one jar at a time.
Why Pickled Carrots with Dill and Garlic Works So Well
Pickled Carrots with Dill and Garlic possess a unique ability to add both depth and vibrancy to meals. The balance between fresh dill, savory garlic, and the crunch of the carrots creates a delightful bite that complements various dishes.
Here’s the secret: the combination of acidity from vinegar and salt not only builds flavor but also acts as a natural preservative, making the carrots crisp and delicious for months.
Quick Answer: The secret to perfect Pickled Carrots with Dill and Garlic is the ratio of vinegar to water and the freshness of your ingredients.
The crisp bite of the carrots complements smoky meats and spicy tacos flawlessly, making them essential. Adding Pickled Carrots to your meals offers not just flavor but also health benefits, as carrots are packed with vitamins.
For more inspiration, check out our Peanut Butter Chicken Recipe for a delicious pairing with your pickled creations!
Ingredients, Substitutions & Foolproof Steps
I’ve learned through the years that a great recipe starts with high-quality ingredients. Let’s look at what you’ll need for your Pickled Carrots with Dill and Garlic and some substitutions that can enhance your experience.
- 6 lbs baby carrots — These naturally sweet bites provide the perfect crunch. If unavailable, regular carrots will work; just peel and cut them into quarters.
- 5 cloves garlic — Garlic amplifies flavor; substitute with shallots for a milder taste if desired.
- 1 tbsp dill seed — Fresh herbs are best, but dried dill can substitute if fresh is unavailable.
- 5 heads of flowering fresh dill — This herb not only flavors but beautifies. Alternatively, use dried dill.
- 4 cups water — Vital for brining; feel free to experiment with low-sodium vegetable broth for extra flavor.
- 4 cups white vinegar — Crucial for tang; apple cider vinegar is a great substitution for a different flavor profile.
- 1/2 cup salt — Pickling salt or undiluted sea salt works to enhance taste and preserve crispness.
Directions / Steps: Fill a hot water bath canner (with a canning rack) with water and bring to a boil while you prep your ingredients:
- Scrub and trim baby carrots to fit a pint jar.
- Peel, trim, and quarter mature carrots lengthwise.
- Wash and inspect 6 pint jars (always do an extra jar just in case) and their lids. Ensure there are no chips on the jar rims and that there’s no rust or dents on the lids.
- Set jars upside down in a large cake pan, adding an inch or two of water. Place in a 250°F oven for ten minutes and keep warm until you are ready to fill them.
- Place lids and lid rings into a pot and fill with water; set on the stove and heat until they just begin to boil.
- Fill a kettle with water and bring to a boil.
- In a medium pot, combine water, vinegar, and salt. Bring to a boil until salt dissolves.
- Clean and prep garlic and dill.
- Take jars out of the oven, adding a half clove of garlic followed by a head of flowering dill.
- Quickly but purposefully pack the carrots into the pint jar tightly.
- Pack in another half of garlic, then add a pinch of dill seed.
- Top with hot brine, leaving 1 cm headspace.
- Seal jars tightly but not too tight.
- Place jars in the canning rack and repeat until finished.
- Ensure your canning pot has an inch of water above the jars, then turn the heat to high, processing at a rolling boil for 10 minutes at sea level. Adjust for altitude as needed.
- Remove and let sit on the counter overnight. Check seals and refrigerate any that do not seal.
Common Mistakes to Avoid:
- Overstuffing jars makes sealing difficult.
- Not using enough vinegar can produce soft pickles.
Pro Tips:
- Ensure all jars are sterilized for the best results.
- Maintain consistency in carrot sizes for even pickling.
Nutrition Highlights
| Nutrient | Per Serving | |————|————-| | Protein | 7g | | Carbs | 12g | | Fat | 6g |
Want to pair your pickles with a comforting meal? Check out our recipe for Chicken and Rice Soup!
Serving, Storage, & Freezer Tips
How to Serve Pickled Carrots with Dill and Garlic
These bright, zesty carrots shine in a variety of presentations! Whether served alongside grilled meats at a summer barbecue, tossed into a fresh salad, or featured in a sandwich, they pack a punch that elevates any meal.
How to Store Pickled Carrots with Dill and Garlic
Store your sealed jars in a cool, dark place, like a pantry or cupboard. Once opened, keep them in the refrigerator. Properly sealed and stored, they can last up to a year.
Can You Freeze Pickled Carrots with Dill and Garlic?
Freezing is not recommended for pickled carrots, as they lose their delightful crunch. However, once opened, keep them chilled in the fridge to savor their zing and zest.
Reflecting back, I realize that the act of preserving that first crisp, flavorful bite not only nourished my stomach but also my soul, evoking cherished memories of loved ones gathering around the kitchen table.
FAQ Section
1. How long should I let my pickled carrots sit before eating? Allow the pickled carrots a few weeks in the fridge for their flavors to meld. The waiting is certainly worth it!
2. Can I use other vegetables for pickling? Absolutely! Many vegetables like cucumbers, green beans, and even radishes work wonderfully in pickling brine.
3. What should I do if my jars did not seal? If you find any jars that haven’t sealed, simply refrigerate those and consume them within a few weeks.
4. Are pickled carrots nutritious? Yes, they are a fiber-rich food! Plus, the pickling process retains many nutrients naturally found in the vegetables.
Conclusion
Every jar of Pickled Carrots with Dill and Garlic represents a love letter to the past, a burst of flavor that encourages deep connections. As you savor these carrots, remember they are more than just a recipe—they’re about reliving precious moments and sharing them with your loved ones.
“If this recipe reminds you of someone you love, share it with them. Your memories keep recipes alive.”
You May Also Like
Make the most of this season—join in tradition, create your own stories, and share the taste of love with Pickled Carrots with Dill and Garlic.
Pickled Carrots with Dill and Garlic
Ingredients
Method
- Fill a hot water bath canner (with a canning rack) with water and bring to a boil while you prep your ingredients.
- Scrub and trim baby carrots to fit a pint jar.
- Peel, trim, and quarter mature carrots lengthwise.
- Wash and inspect 6 pint jars (always do an extra jar just in case) and their lids. Ensure there are no chips on the jar rims and that there’s no rust or dents on the lids.
- Set jars upside down in a large cake pan, adding an inch or two of water. Place in a 250°F oven for ten minutes and keep warm until you are ready to fill them.
- Place lids and lid rings into a pot and fill with water; set on the stove and heat until they just begin to boil.
- Fill a kettle with water and bring to a boil.
- In a medium pot, combine water, vinegar, and salt. Bring to a boil until salt dissolves.
- Clean and prep garlic and dill.
- Take jars out of the oven, adding a half clove of garlic followed by a head of flowering dill.
- Quickly but purposefully pack the carrots into the pint jar tightly.
- Pack in another half of garlic, then add a pinch of dill seed.
- Top with hot brine, leaving 1 cm headspace.
- Seal jars tightly but not too tight.
- Place jars in the canning rack and repeat until finished.
- Ensure your canning pot has an inch of water above the jars, then turn the heat to high, processing at a rolling boil for 10 minutes at sea level. Adjust for altitude as needed.
- Remove and let sit on the counter overnight. Check seals and refrigerate any that do not seal.