There’s something undeniably nostalgic about the smell of fresh bread wafting through the kitchen. Do you remember the last time you bit into a perfectly crafted hoagie roll, its crusty exterior giving way to a soft, pillow-like interior? If you’ve never tried making your own at home, you may be missing out on a culinary adventure that delights the senses and nourishes more than just the body. Picture this: a rainy afternoon, the children at your feet, and the promise of homemade hoagie rolls rising on the counter fills the air with warmth. If that sounds familiar—or even a bit enticing—you’re in the right place.
Welcome to the Homemade Hoagie Rolls Recipe, where we’ll dive into the art of baking your own bread that transforms any meal into a delightful occasion. In times when we seem to be reaching for store-bought convenience more often than not, isn’t it refreshing to take a step back and remind ourselves of the simple joys that come from baking at home?
The Journey to Homemade Hoagie Rolls
We’ve all been there. You’re rushing to put dinner together, navigating the hectic lives we lead, and your aspirations for a comforting homemade meal are sidelined by the allure of a quick trip to the grocery store. My pivotal moment came when I decided that rather than sacrificing flavor and texture for convenience, I’d commit to taking an hour to make hoagie rolls from scratch.
Let me tell you, that was a game-changer. I’ve made my share of hoagies and sandwiches over the years, but nothing beats the satisfaction of layering my favorite ingredients—meats, cheeses, sautéed veggies—on a roll I made myself.
A Brief Backstory
It was a chilly Saturday afternoon when I first tried my hand at homemade hoagie rolls. As I stirred the dough, I reminisced about family road trips and summer picnics where homemade sandwiches took center stage. Each knead of the dough was an act of love and tradition, weaving memories into every roll. You see, the kitchen is where we laugh, share stories, and connect with one another. And nothing brings people together quite like the aromas and flavors of home-cooked comfort.
Creating the Homemade Hoagie Rolls Recipe is not just about baking bread; it’s about reclaiming the simple pleasures of family meals, lovingly prepared in kitchens across the country. Embracing this process can be incredibly fulfilling, and I encourage you to give it a try. Remember, perfection is not important; joy is.
Why This Homemade Hoagie Rolls Recipe Works
Understanding why this recipe yields such delightful results can enrich your baking experience. The combination of warm milk, active yeast, and a touch of sugar creates an ideal environment for dough to rise beautifully. The magic truly happens when you knead the dough well, allowing gluten to develop, resulting in a soft and chewy texture.
Also, let’s not overlook how easy it is to customize these rolls to better suit your taste. Opt for whole-wheat flour for a heartier roll, or mix in herbs or cheese to elevate them even more.
Quick Answer: The secret to perfect Homemade Hoagie Rolls Recipe is ensuring the yeast is active and allowing the dough to rise properly for that perfect texture.
In addition to the yeast and flour, be sure to keep kosher salt on hand, as it enhances the flavor of the rolls significantly. A mistake often made is skipping the salt, thinking it won’t matter, but trust me, it does!
Looking for more inspiration? Consider checking out our articles on Breakfast Sides for Busy Mornings and Ultimate Guide to Cocktails, which can complement your hoagie creations splendidly!
Ingredients, Substitutions & Foolproof Steps
As you embark on this baking journey, here’s what you’ll need:
- 1 Tablespoon active dry yeast — Look for brands like Red Star for the best results; it’s vital for fluffiness.
- 2 Tablespoons granulated sugar — This helps to feed the yeast, promoting a good rise. Feel free to use honey if you’re looking for alternatives.
- 2 1/2 cups 1% milk (warm to 100-110°F) — Warm milk is essential for activating yeast without killing it; use any milk you have on hand.
- 5 ¾ cups all-purpose flour, plus more as needed — An all-purpose blend works best; you can also use bread flour for added chewiness.
- 2 teaspoons kosher salt — A small amount enhances overall flavors; table salt can work in a pinch, but reduce to 1 teaspoon.
- 1/4 cup softened butter (cut into cubes) — Butter adds richness; vegetable oil can substitute if needed.
- 1 large egg — Provides color and richness; a flax egg works if you’re vegan.
- 1 tablespoon water — To create an egg wash for shiny tops.

Directions / Steps
- In a large standing mixer bowl, combine the yeast, sugar, and warmed milk. Stir gently to mix and let sit for 10-15 minutes until the mixture becomes bubbly, indicating that the yeast is active.
- Add about 4 cups of flour and kosher salt to the yeast mixture. Mix using the paddle or dough hook attachment, occasionally scraping down the bowl sides.
- Add an additional cup of flour and the cubed softened butter, mixing until the butter is absorbed. Continue adding flour gradually until the dough reaches a slightly sticky but manageable consistency.
- Grease a large bowl with oil. Transfer the dough to the bowl, shape it into a ball, and cover with a clean dish towel. Place the bowl in a warm spot to rise until approximately doubled in size. Rising time may vary depending on temperature and humidity.
- Lightly oil a pastry mat or flat surface. Divide the dough into 12 equal portions (about 110 grams each) using a digital scale for accuracy. Shape each portion into an oblong roll with seams down and ends tucked in. Place the rolls on two parchment-lined baking sheets (6 rolls per sheet), arranging them close together but not touching.
- Cover the shaped rolls with clean dish towels and allow them to rise again until nearly doubled in size.
- Preheat the oven to 350°F (175°C). Using a sharp serrated knife, make a deep slit along the top of each roll. Beat the egg with water to make an egg wash and brush a thin layer over the tops of the rolls to promote browning.
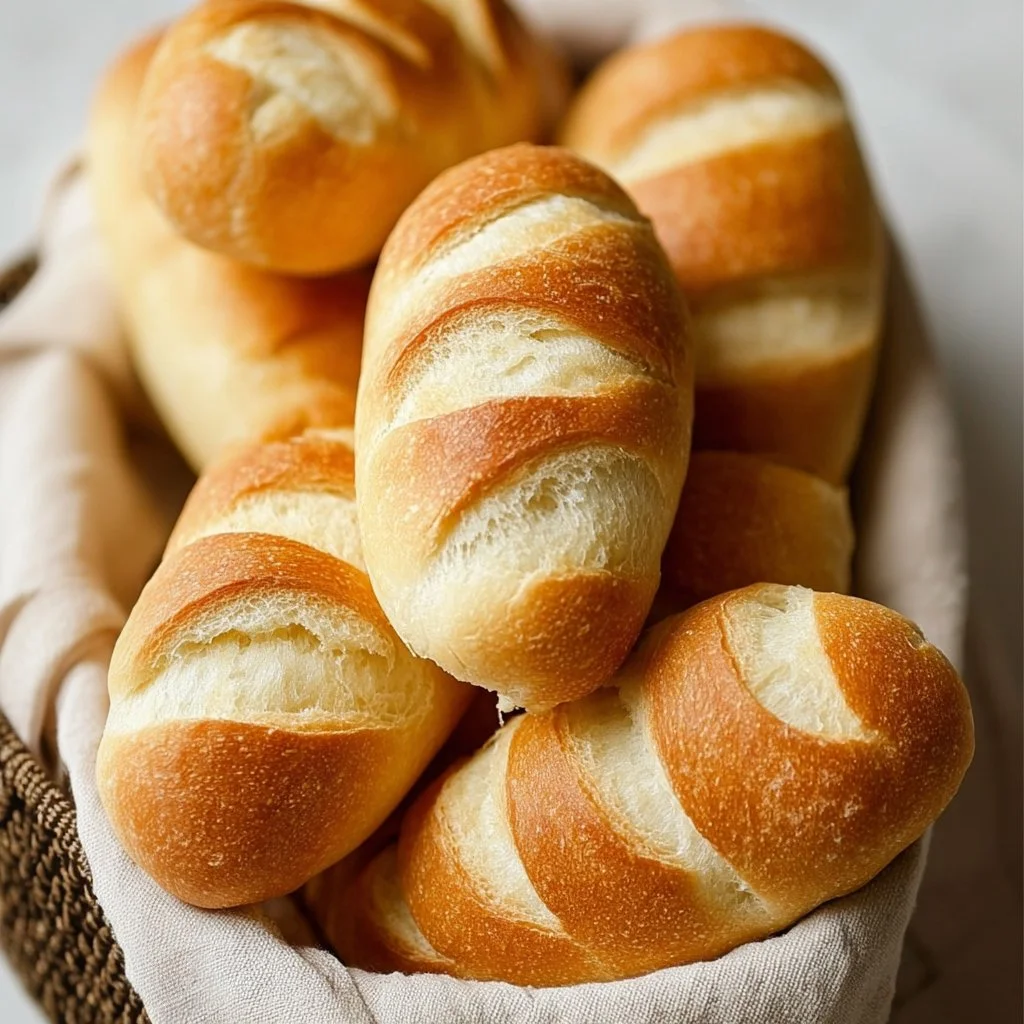
- Bake the hoagie rolls in the preheated oven for 18-20 minutes until the bottoms are lightly browned and the rolls have a golden crust. Remove from the oven and transfer to wire racks to cool before slicing and serving.
Common Mistakes to Avoid
- Inaccurate Measurements: Use a kitchen scale for precise measurements.
- Cold Ingredients: Ensure milk and other ingredients are warmed appropriately to activate yeast.
- Not Kneading Enough: A well-kneaded dough contributes to good texture.
- Skipping the Second Rise: Patience is key; don’t rush the dough’s rising time.
Pro Tips
- For an extra flavor boost, add herbs like rosemary or garlic powder into the dough.
- Brush with olive oil before the second rise for a richer flavor.
- Experiment with different flours for varied textures.
If you find joy in sharing meals, take a look at Alice Springs Chicken or Sweet and Sour Mix recipes for more culinary creativity!
Serving, Storage & Freezer Tips
How to Serve Homemade Hoagie Rolls Recipe
Serve with your favorite deli meats, cheeses, and fresh toppings like lettuce, tomatoes, and pickles. These rolls are perfect for hearty sandwiches or toasted as part of a meal.
How to Store Homemade Hoagie Rolls Recipe
Store in an airtight container at room temperature for up to three days.
Can You Freeze Homemade Hoagie Rolls Recipe?
Absolutely! Wrap each roll in plastic wrap and place in a freezer-safe bag for up to three months. To enjoy, thaw overnight and reheating in the oven for a crunchy crust.
Reflecting back, this recipe not only fills hungry bellies but also nourishes connections to family and tradition. Baking these rolls has the potential to become a cherished memory in your kitchen.
FAQ Section
Can I use instant yeast instead of active dry yeast?
Yes! You can use instant yeast directly without proofing it in warm water. Replace the active dry yeast with the same amount of instant yeast.
How can I tell when the dough has risen enough?
The dough should double in size. You can gently poke it; if the indentation remains, it’s ready for the next step.
What can I add to this recipe for flavor?
Feel free to experiment with adding herbs, seasoning, or even grated cheese to the dough.
How long can I store baked hoagie rolls?
Baked hoagie rolls can be stored in an airtight container for about three days at room temperature or up to three months in the freezer.
Conclusion
A freshly made Homemade Hoagie Rolls Recipe brings warmth and comfort to the table, creating more than just a meal but a moment of joy to be savored and shared. If this recipe reminds you of someone you love, share it with them. Your memories keep recipes alive.
Homemade Hoagie Rolls
Ingredients
Method
- In a large standing mixer bowl, combine the yeast, sugar, and warmed milk. Stir gently to mix and let sit for 10-15 minutes until bubbly.
- Add about 4 cups of flour and kosher salt to the yeast mixture. Mix using the paddle or dough hook attachment.
- Add an additional cup of flour and the cubed softened butter, mixing until absorbed. Add flour gradually until dough is slightly sticky but manageable.
- Grease a large bowl with oil. Transfer the dough to the bowl, shape it into a ball, and cover with a clean dish towel. Let rise until doubled in size.
- Divide the dough into 12 equal portions. Shape each into an oblong roll. Place on two parchment-lined sheets, arranging close together but not touching.
- Cover the rolls and let rise again until nearly doubled in size.
- Preheat the oven to 350°F (175°C). Make a deep slit along the top of each roll.
- Beat the egg with water and brush a thin layer over the tops of the rolls.
- Bake for 18-20 minutes until the bottoms are lightly browned and rolls have a golden crust. Transfer to wire racks to cool.