
Creating delicious desserts can sometimes feel overwhelming, especially if you’re juggling family commitments and meal plans. With all the demands of daily life, it’s easy to experience cooking fatigue. The Mini Tiramisu Cheesecake Recipe is your perfect solution. This delectable dessert not only satisfies your sweet tooth but also allows you to take charge of your nutrition goals. It’s low-carb, freezer-friendly, and a delightful treat that lets you enjoy the classic flavors of tiramisu in a new and exciting way.
Kitchen Frustration That Makes This Recipe a Lifesaver
We’ve all been there—standing in the kitchen, exhausted after a long day, with a craving for something sweet. Whether it’s post-work fatigue or the stress of family gatherings, the thought of baking a complex dessert can be daunting. That’s where the Mini Tiramisu Cheesecake Recipe shines, making it easier than ever to indulge in your favorite flavors without spending hours in the kitchen.
This recipe is a practical answer to the common problems of sticking to a meal plan or cooking for a crowd. It’s designed to be time-saving and easy to prepare, so you won’t feel overwhelmed. The creamy layers of a traditional tiramisu, combined with the ease of a cheesecake, create a perfect balance that satisfies both your taste buds and your heart. Remember, this is a recipe you can make ahead of time, so you can enjoy the moment without the stress.
Why This Mini Tiramisu Cheesecake Recipe Works So Well
Quick Answer: The Mini Tiramisu Cheesecake is a protein-packed, freezer-friendly dessert that marries cheesecake’s creamy texture with the rich flavors of classic tiramisu, all while remaining family-style and budget-friendly.
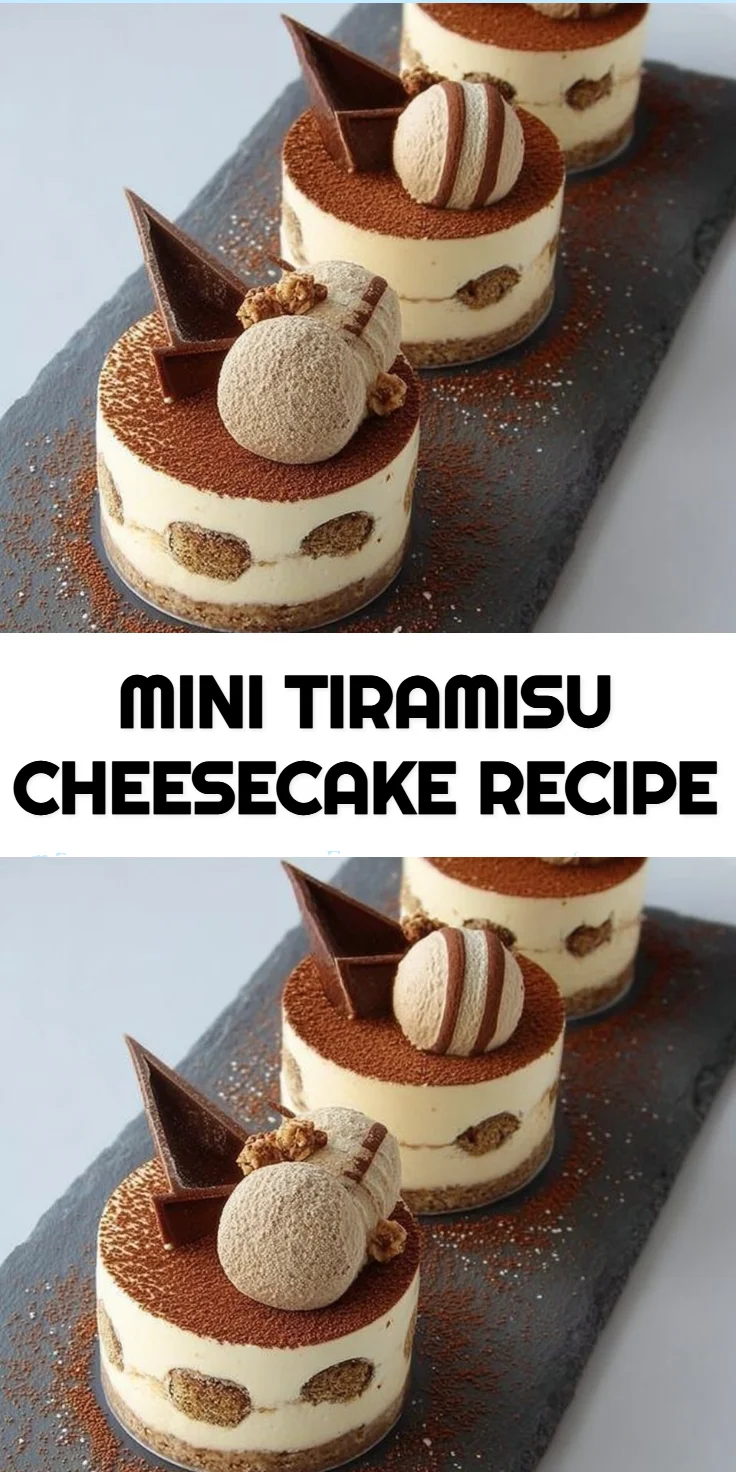
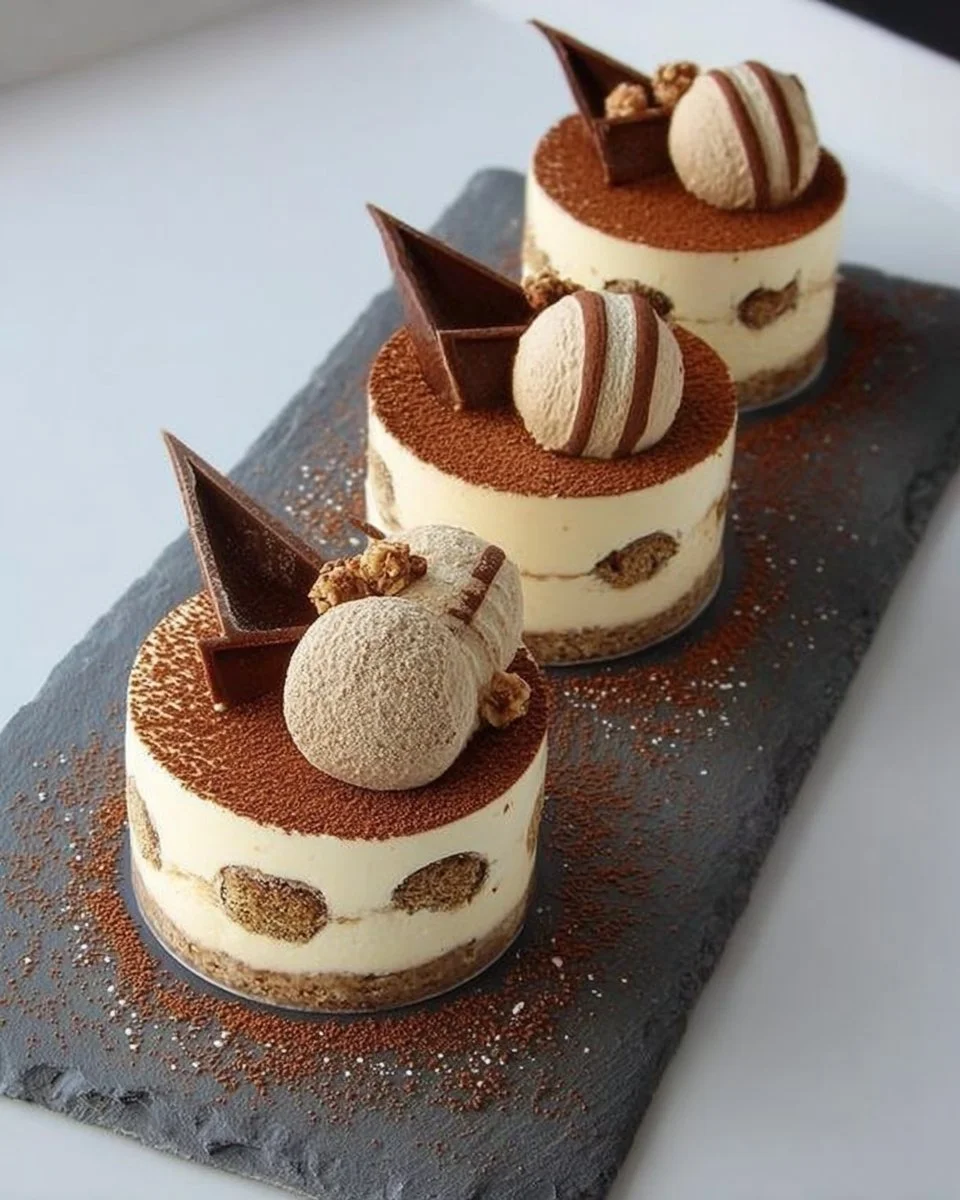
The Mini Tiramisu Cheesecake Recipe combines the lightness of cheesecake with the rich and robust flavors of coffee and chocolate. The base of crushed cookies provides a delightful crunch that contrasts beautifully with the creamy filling. Plus, the layer of ganache truffle balls on top adds an indulgent finish that will impress anyone from your family to friends.
This recipe is crafted not just for taste but also for health-conscious individuals. With less sugar than traditional desserts and the option to make it with lighter ingredients, you can enjoy a guilt-free treat. Ideal for portion control and budget-friendly while feeding a crowd, every bite of these mini delights is a reminder that you can indulge without compromising nutritional values.
Ingredients, Substitutions & Foolproof Tips
- 260 g Cookies (mix plain and chocolate): Provides a crunchy base; feel free to use gluten-free cookies if necessary.
- 120 g Unsalted Butter (melted): Binds the cookie crumbs for the base; ensure it’s fully melted for best consistency.
- ⅓ cup Water (hot from the kettle) & 4 tsp Gelatine (powder): Creates the cheesecake’s stability; allow the gelatine to dissolve completely.
- 500 g Cream Cheese (softened): Essential for a creamy texture; let it sit out before mixing for better blending.
- ¾ cup Powdered Sugar: Adds sweetness and helps in achieving a smooth filling; can be adjusted to taste.
- ½ cup Coffee (warm): Infuses the cheesecake with rich flavor; use your favorite brew.
- 1 tsp Vanilla Extract: Enhances the flavor profile; opt for pure vanilla for the best taste.
- 450 ml Heavy Cream: Whipped for a light and airy filling; ensure it’s cold for best whipping results.
- 12 Ladyfingers (sponge finger biscuits): Provide the traditional tiramisu texture; you can substitute with any sponge cake.
- 1½ cups Coffee (cold): Used for dipping the ladyfingers; prepare ahead and chill.
- 300 g Dark Chocolate (chopped): Used for ganache; choose high-quality chocolate for rich flavor.
- 200 g Heavy Cream (for ganache): Adds richness; once again, cold cream is ideal for emulsifying.
- ½ tbsp Cocoa Powder (for dusting): Adds an elegant finish; sift for a fine dusting.
- 6 Wafer Rolls (Picollo): Optional garnish for an extra crunch.
Step-by-Step Directions
- Make the Biscuit Base: Crush the cookies into fine crumbs using a stick blender or a rolling pin. Combine the crumbs with the melted butter until well mixed. Press this mixture into the base of a cupcake tray lined with baking cups. Chill in the refrigerator while you prepare the cheesecake layer.
- Prepare the Coffee Cheesecake Filling: In a small bowl, dissolve the gelatine powder in boiling water and set aside. In a large bowl, combine the softened cream cheese and powdered sugar, beating until smooth. Add in the warm coffee and vanilla extract, mixing until well combined. Gently fold in the whipped heavy cream. Slowly incorporate the warm gelatine mixture, ensuring it blends smoothly. Spoon half of this mixture over the biscuit base. Cut the ladyfingers in half, dip in the cold coffee, and place on top of the cheesecake layer in each cupcake liner. Top with the remaining cheesecake mixture and smooth the top. Freeze for a minimum of 6 hours, or overnight.
- Make the Ganache Truffle Balls: Heat the 200 g heavy cream in a saucepan until just boiling. Pour the hot cream over the chopped dark chocolate and allow it to sit for a minute before stirring until smooth. Refrigerate the ganache until firm and then scoop into balls using a melon baller.
- Garnish and Serve: Once the mini cheesecakes have frozen, gently remove them from the moulds and place them on a serving plate. Top each mini cheesecake with a ganache ball and dust with cocoa powder before serving. Allow to thaw in the refrigerator for at least 2 hours before serving for the best texture.
Common Mistakes to Avoid & Pro Tips
- Mistake: Undershooting the chill time.
- Fix: Allowing the cheesecakes to freeze overnight ensures they hold their shape.
- Mistake: Overmixing the cream cheese mixture.
- Fix: Be gentle when folding in the whipped cream to maintain airiness.
- Mistake: Not properly dissolving gelatine.
- Fix: Make sure the gelatine is fully dissolved in boiling water for an even consistency.
Pro Tips
- Consider making these mini cheesecakes a day ahead for the best flavor.
- Use a food processor for speeding up cookie crumbling.
- For a deeper flavor, try experimenting with flavored coffee.
Serving, Storage & Freezer Guide
How to Serve Mini Tiramisu Cheesecake Recipe
These mini tiramisu cheesecakes are perfect for gatherings or a cozy family dinner. Serve them chilled, garnished with a dusting of cocoa powder and a ganache truffle on top to impress your guests. Pairing them with a rich espresso or a dollop of whipped cream can elevate the experience even further. They also make a beautiful presentation when served on a nice platter, showcasing their individual layers.
How to Store Mini Tiramisu Cheesecake Recipe
Store any leftover mini cheesecakes in an airtight container in the refrigerator. They’ll remain fresh for up to five days—perfect for keeping your dessert cravings in check throughout the week! If you anticipate needing these for a future occasion, consider the freezer option below.
Can You Freeze Mini Tiramisu Cheesecake Recipe?
Yes, you can freeze the mini tiramisu cheesecakes! After they have fully set in the mold, wrap them tightly in plastic wrap or place them in a freezer-safe container. They can be frozen for up to three months. To serve, simply thaw them overnight in the refrigerator before enjoying.
Frequently Asked Questions
What’s the best way to ensure my cream cheese is softened properly?
Allow your cream cheese to sit at room temperature for about 30 minutes before using it. If you’re short on time, you can cut it into small pieces to accelerate the softening process.
Can I use different flavored coffee for the cheesecake?
Absolutely! Experimenting with flavored coffee (like vanilla or hazelnut) can add an interesting twist to your cheesecake. Just ensure it remains within the same flavor profile.
How can I make this recipe lower in sugar?
You can substitute the powdered sugar with a sugar alternative such as erythritol or stevia, adjusting the amount based on the brand’s sweetness level.
What if my ganache isn’t setting properly?
Make sure the cream used for the ganache reaches a full boil before combining with the chocolate. After refrigerating, if it’s still soft, allow more time for it to cool, or place it briefly in the fridge.
Conclusion
The Mini Tiramisu Cheesecake Recipe is more than just a delightful dessert; it’s a way to bring people together and create cherished moments. This recipe accommodates various dietary needs while still delivering on flavor and nostalgia. If this recipe reminds you of someone you love, share it with them. Your memories keep recipes alive.

Mini Tiramisu Cheesecake
Ingredients
Method
- Crush the cookies into fine crumbs using a stick blender or a rolling pin.
- Combine the crumbs with the melted butter until well mixed.
- Press this mixture into the base of a cupcake tray lined with baking cups.
- Chill in the refrigerator while you prepare the cheesecake layer.
- In a small bowl, dissolve the gelatine powder in boiling water and set aside.
- In a large bowl, combine the softened cream cheese and powdered sugar, beating until smooth.
- Add in the warm coffee and vanilla extract, mixing until well combined.
- Gently fold in the whipped heavy cream.
- Slowly incorporate the warm gelatine mixture, ensuring it blends smoothly.
- Spoon half of this mixture over the biscuit base.
- Cut the ladyfingers in half, dip in the cold coffee, and place on top of the cheesecake layer in each cupcake liner.
- Top with the remaining cheesecake mixture and smooth the top.
- Freeze for a minimum of 6 hours, or overnight.
- Heat the 200 g heavy cream in a saucepan until just boiling.
- Pour the hot cream over the chopped dark chocolate and allow it to sit for a minute before stirring until smooth.
- Refrigerate the ganache until firm and then scoop into balls using a melon baller.
- Once the mini cheesecakes have frozen, gently remove them from the moulds and place them on a serving plate.
- Top each mini cheesecake with a ganache ball and dust with cocoa powder before serving.
- Allow to thaw in the refrigerator for at least 2 hours before serving for the best texture.