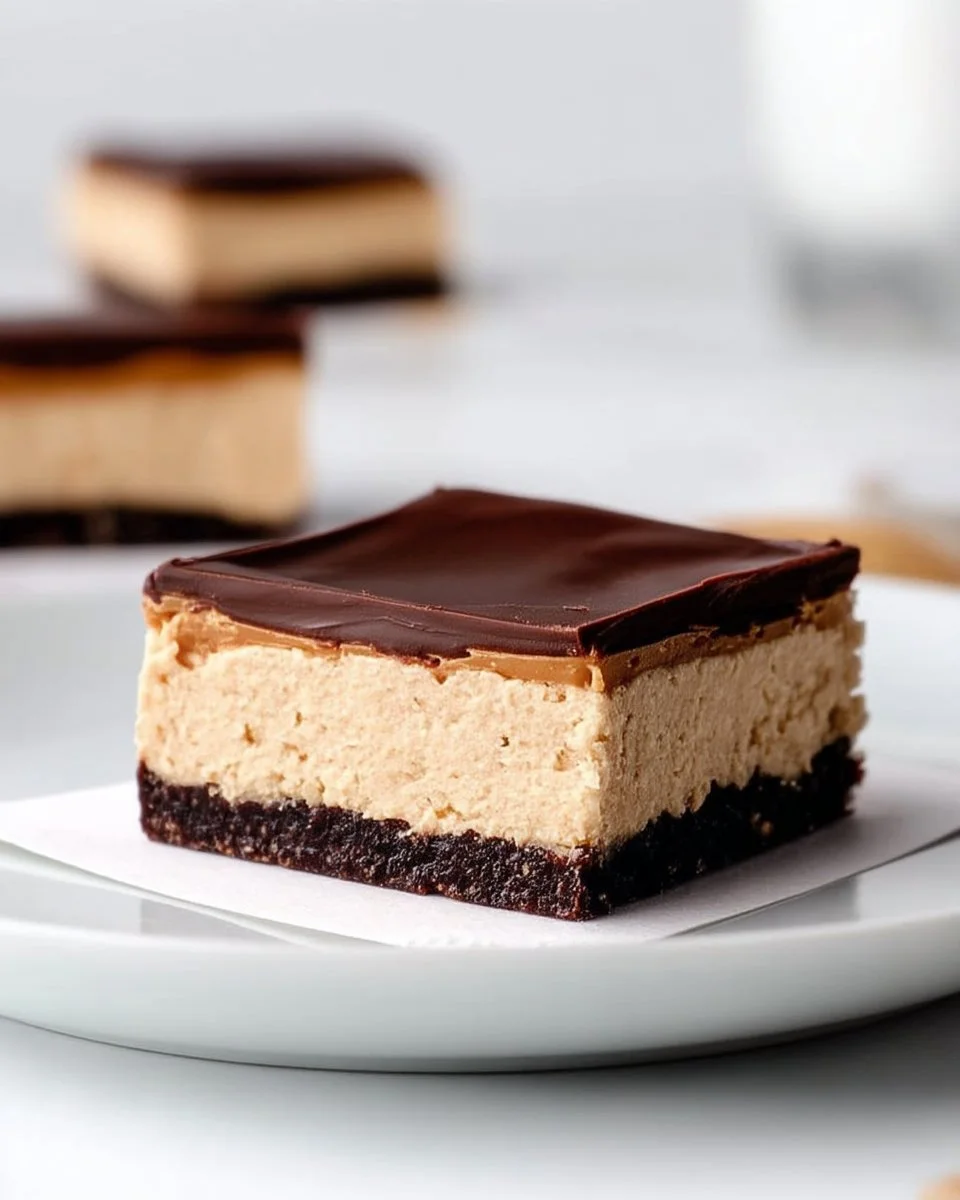
Low Carb No-Bake Peanut Butter Pie Bars
Low Carb No-Bake Peanut Butter Pie Bars
Are you tired of spending hours in the kitchen, trying to whip up a dessert that fits into your meal plan while still satisfying your family’s sweet tooth? Finding a balance between delicious and nutritious can feel like an impossible task, especially when you’re looking to keep things low carb. If you’re nodding in agreement, these Low Carb No-Bake Peanut Butter Pie Bars might be just what you need. They’re not only rich in flavor but also aligned with your health goals, making them a perfect solution for those who are calorie-conscious and looking for a protein-packed treat.
Kitchen Frustration That Makes This Recipe a Lifesaver
Many of us have been in that kitchen battle, trying to meet the demands of our families while keeping our nutrition goals front and center. As a busy mom or grandparent, the last thing you want is to spend your whole day baking something that might go uneaten because it’s not everyone’s cup of tea. That’s where these Low Carb No-Bake Peanut Butter Pie Bars come to the rescue.
Imagine pulling a tray of these scrumptious bars from the fridge after a long day, only to find that they’re perfect for satisfying cravings without derailing your meal plan. Made in just a few easy steps, this recipe eliminates the hassle of baking and makes portion control a breeze. With a little preparation, you can offer a dessert that everyone will love without the guilt.
Why This Low Carb No-Bake Peanut Butter Pie Bars Works So Well
Quick Answer:
These bars are a delicious balance of creamy peanut butter goodness, low-carb chocolate, and a satisfying crust, making them a nutritious dessert option that checks all the boxes.
The emotional allure of peanut butter pie is universal—it’s indulgent, nostalgic, and comforting. But with these Low Carb No-Bake Peanut Butter Pie Bars, you’re not sacrificing your health. The combination of creamy peanut butter, rich cream cheese, and decadent low-carb chocolate provides an unmatched flavor and texture experience. The no-bake aspect means it’s a quick and easy treat to whip up, especially for time-saving meals when family or friends drop by unexpectedly.
{image_template}
Ingredients, Substitutions & Foolproof Tips
- 1 cup Low Carb Milk Chocolate – use for a rich topping; consider dark chocolate for a slightly different flavor.
- 1/4 cup Creamy Natural Peanut Butter – enhances the filling’s creaminess; replace with almond butter for a nut-free option.
- 1 tbsp Coconut Oil – adds a silky texture; can be replaced with palm oil if necessary.
- 2 (8 oz) blocks Cream Cheese – brings richness to the filling; use low-fat cream cheese for a lighter option.
- 1/3 cup Swerve Granular – a sugar substitute that allows for sweetness without impacting blood sugar.
- 3/4 cup Natural Creamy Peanut Butter – another layer of peanut flavor; swap with sunflower seed butter for nut-free.
- 3/4 cup Heavy Cream – adds fluffiness to the filling; can switch to coconut cream for a dairy-free version.
- 1/2 tsp Liquid Stevia – compliments the sweetness; optional, based on your personal taste.
- 1 cup Almond Flour – forms the crust base; swap with pecan flour for variation.
- 1/3 cup Swerve Granular – keeps the crust sweet and low in carbs.
- 1/4 cup Unsweetened Cocoa Powder – gives depth of flavor; can also use carob powder for a caffeine-free option.
- 1/4 tsp Xanthan Gum – thickens the filling; optional, particularly if using full-fat ingredients.
- 4 tbsp Butter, room temperature – binds the crust; substitute with coconut oil for a dairy-free alternative.
Step-by-Step Directions
Preheat the Oven
Heat the oven to 350°F and line an 8×8 square pan with parchment paper to prevent sticking, making it easier to lift out your bars later.Whisk the Dry Ingredients
In a small bowl, whisk together the almond flour, cocoa powder, Swerve, and xanthan gum until fully combined, ensuring no lumps remain.Prepare the Crust
Add the butter and cut it in with a fork until the mixture resembles coarse crumbs. Press this mixture firmly into the bottom of the prepared pan and bake for 8 minutes. Allow to cool while you prepare the filling.Whip the Cream
In a large mixing bowl, whip the heavy cream and liquid stevia together until stiff peaks form—this should take about 2-3 minutes of mixing.Make the Filling
In a separate bowl, beat the softened cream cheese, Swerve, and peanut butter until smooth and creamy. Remember to scrape down the sides of the bowl to ensure all ingredients are well mixed.Fold in the Whipped Cream
Gently fold the whipped cream into the cream cheese mixture until just combined—avoid overmixing to keep the filling light and airy.Spread the Filling
Evenly spread the creamy filling over the cooled crust and refrigerate until set, which usually takes about 4 hours, or overnight for best results.Prepare the Topping
Melt the chocolate in a heat-safe bowl by microwaving for 30 seconds at a time, stirring in between until smooth. Add the coconut oil and peanut butter, and mix until fully blended.Top and Chill
Spread this chocolate mixture over the cheesecake layer and allow it to cool for at least 5 minutes before slicing into bars and serving.
Common Mistakes to Avoid & Pro Tips
Mistake: Overmixing the whipped cream.
Fix: Gently fold it in, stopping as soon as no streaks remain.Mistake: Not letting the filling set properly.
Fix: Aim for at least 4 hours in the refrigerator to achieve the best texture.Mistake: Using high-carb or processed ingredients.
Fix: Stick to the specific low-carb ingredients mentioned.Mistake: Skipping the Xanthan gum.
Fix: While it’s optional, it helps to stabilize the filling and improve texture.
Pro Tips
- For a richer flavor, use dark chocolate for your topping.
- Experiment with nut butter flavors; blend peanut butter with a bit of almond butter for a delicious twist.
- These bars are perfect for meal prep—make a batch on the weekend and serve them throughout the week!
Serving, Storage & Freezer Guide
How to Serve Low Carb No-Bake Peanut Butter Pie Bars
Serve these decadent bars chilled, straight from the fridge, for a refreshing treat. They work wonderfully as a dessert for family gatherings or as a sweet snack during the day. Pair them with fresh berries or a dollop of whipped cream for an added touch of elegance.
How to Store Low Carb No-Bake Peanut Butter Pie Bars
Keep your pie bars stored in an airtight container in the refrigerator for up to a week. This way, you can enjoy a small piece each day, making it a satisfying and guilt-free treat at your convenience.
Can You Freeze Low Carb No-Bake Peanut Butter Pie Bars?
Absolutely! These bars freeze beautifully. Cut them into portions, wrap each piece individually, and store them in a freezer-safe container. They can last for up to three months in the freezer. When you’re ready to enjoy, let them thaw in the refrigerator overnight.

Frequently Asked Questions
How many calories are in the Low Carb No-Bake Peanut Butter Pie Bars?
These bars are designed to be low in calories while still being indulgent. Each portion offers a filling treat without the excess sugars typically found in traditional desserts, making them a great option for those monitoring their intake.
Can I make these bars dairy-free?
Yes! You can easily swap out the cream cheese and heavy cream for dairy-free versions, such as vegan cream cheese and coconut cream, to make a delicious dairy-free dessert.
How can I customize the flavor of the bars?
Feel free to experiment with different nut butters, or maybe add some crushed nuts for a bit of crunch in the crust or topping. You could also incorporate flavored extracts like vanilla or almond for added depth.
What if I don’t have Swerve?
If Swerve is unavailable, you can replace it with another low-carb sweetener of your choice, like erythritol or monk fruit sweetener. Just keep in mind that sweetness levels may vary, so you may need to adjust to taste.
Conclusion
Creating a dessert that meets health goals while satisfying cravings can be challenging, but the Low Carb No-Bake Peanut Butter Pie Bars make it so much easier. Not only do these bars taste incredible, but they also support your nutrition objectives in a fun and delicious way. If this recipe reminds you of someone you love, share it with them. Your memories keep recipes alive.

Low Carb No-Bake Peanut Butter Pie Bars
Ingredients
Method
- Preheat the oven to 350°F and line an 8×8 square pan with parchment paper.
- In a small bowl, whisk together the almond flour, cocoa powder, Swerve, and xanthan gum until fully combined.
- Add the butter and cut it in with a fork until the mixture resembles coarse crumbs. Press this mixture into the bottom of the prepared pan and bake for 8 minutes.
- Allow the crust to cool while you prepare the filling.
- In a large mixing bowl, whip the heavy cream and liquid stevia together until stiff peaks form.
- In a separate bowl, beat the softened cream cheese, Swerve, and natural creamy peanut butter until smooth and creamy.
- Fold the whipped cream into the cream cheese mixture until just combined.
- Spread the creamy filling over the cooled crust and refrigerate until set, about 4 hours or overnight.
- Melt the chocolate by microwaving for 30 seconds at a time, stirring in between until smooth. Add the coconut oil and peanut butter, and mix until fully blended.
- Spread the chocolate mixture over the cheesecake layer and allow it to cool for at least 5 minutes before slicing into bars.