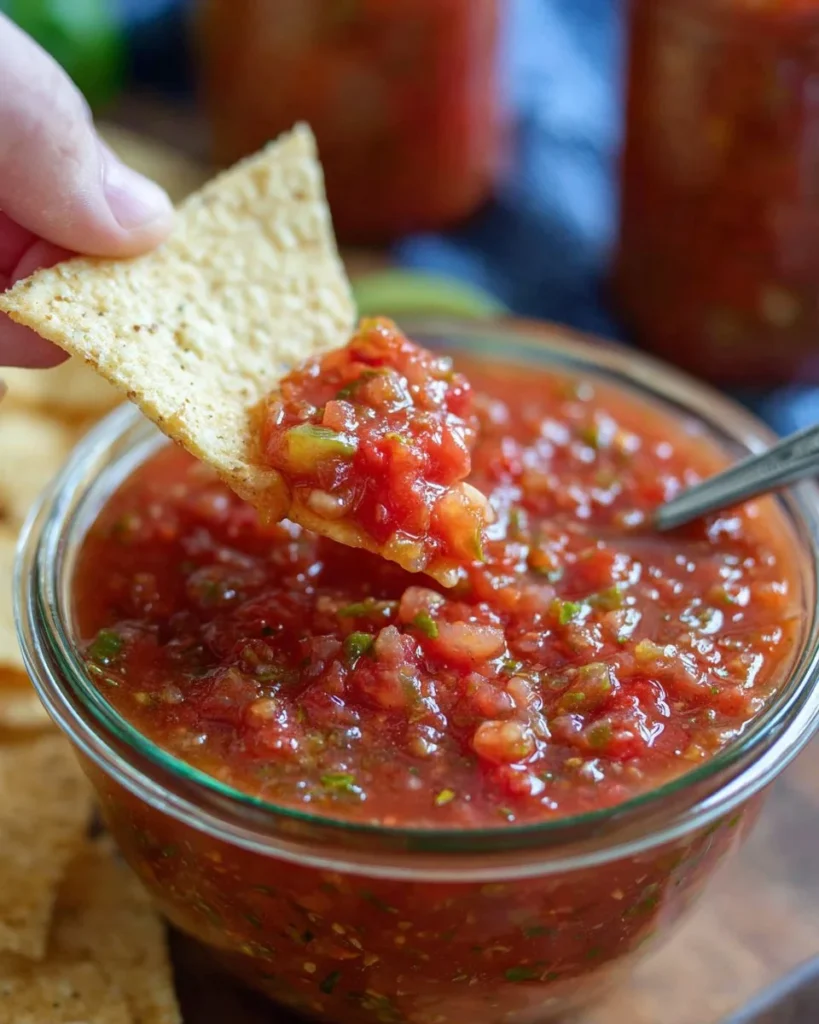
When you think of summer gatherings, the first thing that often comes to mind is a vibrant bowl of salsa, bursting with freshness. There’s nothing quite like the taste of homemade salsa made from ripe, juicy tomatoes, complemented by the bold flavors of garlic and onion. The crunch of green and jalapeño peppers provides a delightful contrast, while the tanginess from vinegar and a hint of sweetness unite to create an unforgettable dip. Imagine serving up this flavorful treat at your next fiesta, its rich colors instantly drawing guests in for a taste. Not only does the aroma wafting from the kitchen enhance the atmosphere, but the recipe also stands out as an easy and enjoyable cooking experience. The added satisfaction of preserving your salsa in jars means you can relive those summer evenings all year round. Get ready to elevate your snacking game with this delightful homemade creation, perfect for chips, tacos, or simply enjoying on its own!
Why You’ll Love This Recipe
This homemade salsa is a game-changer for snack lovers and party hosts alike. The versatility of flavors means you can adjust the heat level to suit any palate, whether you prefer mild freshness or spicy kicks from the jalapeños. Not only is it an amazing dip, but it also serves as an excellent topping for grilled meats and veggie dishes. Plus, the satisfaction of crafting your own salsa adds to the overall experience! By following this straightforward canning method, you’re able to enjoy this delicious recipe any time of year while saving money compared to store-bought options. You’ll be amazed at how easy it is to capture summer’s essence in a jar, providing your family with healthy, homemade goodness whenever cravings strike.
What Makes This Recipe Special
What really sets this salsa apart is the combination of fresh, high-quality ingredients and the ability to preserve it for future enjoyment. Each ingredient is carefully balanced to create layers of flavor that can only be achieved through homemade methods. From the aromatic garlic to the earthy cumin and fresh herbs, each element plays a vital role in elevating the salsa. The process itself is a rewarding experience, as you transform raw ingredients into something incredibly tasty. Using sterilized jars also ensures that your salsa stays fresh for longer, making this an ideal project for anyone wanting to indulge in wholesome food that lasts. The independence of canning means you get to enjoy a burst of garden-fresh flavor each time you crack open a jar. Simply put, this recipe goes beyond taste; it’s about connection, creativity, and enjoying the fruits of your labor.
Ingredients
Garlic: Provides a bold, aromatic base for flavor enhancement.
Onion: Adds sweetness and texture to the salsa.
Green peppers: Contributes a fresh crunch and mild flavor.
Jalapeno peppers: Adds heat, adjustable based on personal preference.
Tomatoes: The star of the recipe, providing juiciness and richness.
Cumin: Adds warm earthiness, enhancing the overall flavor profile.
Cilantro: Introduces a bright, fresh note, used fresh or dried.
Oregano: Brings a hint of herby depth to the mix.
Salt: Enhances natural flavors and balances the overall taste.
Pepper: Adds a touch of warmth and spiciness.
Sugar: Balances acidity and adds a hint of sweetness.
White vinegar: Provides tanginess and helps preserve the salsa.
Tomato paste: Thickens the salsa and intensifies tomato flavor.
How to Make Best Homemade Canned Salsa
STEP 1. Combine the ingredients. In a large pot, mix garlic, onion, green peppers, jalapeno peppers, tomatoes, cumin, cilantro, oregano, salt, pepper, sugar, vinegar, and tomato paste.
STEP 2. Cook the mixture. Bring the pot to a boil over medium heat, then reduce to a simmer for 10 to 15 minutes, stirring often until flavors meld and the salsa thickens.
STEP 3. Prepare the jars. While the salsa simmers, place sterilized pint-size canning jars on a cookie sheet in an oven set to 200°F to warm them.
STEP 4. Warm the lids. Simmer the canning lids (not the rings) in a separate pan of hot water while the salsa cooks.
STEP 5. Fill the jars. Carefully take out a jar from the oven, fill it with the hot salsa, leaving 1/2-inch space at the top.
STEP 6. Seal the jars. Wipe the rim of the jar clean, place a lid on top, and screw on a ring securely.
STEP 7. Process the jars. Process the jars in a boiling water or steam bath canner for 15 minutes, adjusting for altitude.
STEP 8. Cool the jars. Once processed, remove jars carefully from the water and let them cool to room temperature on a towel.
STEP 9. Check seals. Press the top of each lid; it should feel firm. If it pops back, refrigerate or reprocess the jar.
STEP 10. Invert to seal. Place each jar upside down on a kitchen towel overnight without disturbance for a tight seal. If using fresh cilantro, add it just before filling jars.

Pro Tips
To achieve the best results with your salsa, make sure to choose ripe, high-quality tomatoes, as they significantly impact flavor and texture. Ensure that all utensils and jars are properly sterilized to eliminate any bacteria that could spoil your salsa. When selecting your jalapeños, remember that the heat can vary; consider tasting them first to gauge how much you’ll want to include. Adjust seasonings to suit your personal preferences; more cumin or sugar can elevate and round out flavors even further. If you’re new to canning, submit an extra jar for testing purposes. To save time during preparation, you can chop your vegetables in advance or use a food processor for quick and even dicing. Finally, don’t skip the cooling process—allowing jars to cool gradually will help in achieving a reliable seal, ensuring your salsa stays fresh longer.
Common Mistakes to Avoid
One of the most frequent missteps when making homemade salsa is not using enough salt; it’s crucial for flavor balancing and preservation. Many novice canners also skip the sterilization step, which can lead to spoilage. Improperly calculating cooking times for your altitude is another common error; be sure to adjust accordingly. Don’t overlook the importance of gently simmering the mixture; cooking it too quickly can lead to an unbalanced flavor and inconsistent texture. Failing to leave the appropriate space at the top of the jar during filling can result in poor sealing or overflow during processing as well. Additionally, be mindful not to touch the inside of the jar lids or rims, as that can contaminate the seal. Finally, neglecting to check the seals after cooling can lead to wasted efforts if any jars are left unsealed.
Variations
• Add pineapple for a sweet tropical twist.
• Substitute lime juice for vinegar for a zesty flavor.
• Include black beans for a heartier texture.
• Use roasted tomatoes for a smoked flavor.
• Experiment with different peppers like serrano or habanero for varying heat levels.
Serving Ideas
This homemade salsa is perfect for scooping up with crispy tortilla chips on game day. Spread it on tacos or burritos for an added zing, or mix it into a fresh salad for a flavorful dressing. Pair it with grilled chicken or fish as a zesty topping, or incorporate it into omelets for a brunch surprise. Hosting a fiesta? Set up a taco station and let guests customize their meals with this vibrant salsa as an essential component.
Meal Prep & Storage
Your homemade salsa can be stored in sealed jars in a cool, dark place for up to a year if processed correctly. Once opened, store it in the refrigerator for up to two weeks. For meal prep, consider dedicating a weekend to making a large batch, letting each jar represent a taste of summer ready to enjoy later. If you’re short on time, making smaller batches can help you prepare fresh salsa more often. Pairing your canned salsa with fresh produce and proteins transforms easy dinner ideas into nutritious meals, ideal for quick family dinners.
{image_template}
FAQs
1. Can I use canned tomatoes instead of fresh ones?
Yes, canned tomatoes can work in a pinch, but fresh tomatoes lend better flavor and texture if available.
2. How can I adjust the spiciness of my salsa?
To lower the heat, use fewer jalapeños or remove the seeds and membranes. For more heat, add extra jalapeños or include hotter peppers.
3. What’s the best way to thicken my salsa?
If the salsa is too thin, simmer it a little longer to allow excess moisture to evaporate. You can also add more tomato paste for a thicker consistency.
4. How do I know my salsa has sealed properly?
After cooling, press the center of each lid; if it doesn’t pop back, the seal is good. If it does, refrigerate and use that jar first.
5. Can I adjust the herbs and spices?
Absolutely! Feel free to customize the herbs and spices to match your personal taste. Every adjustment can lead to delightful results.
Conclusion
Making your own canned salsa is not just about having a delicious dip on hand; it’s about savoring the authentic flavors of home. This vibrant recipe invites creativity and personal touches, allowing you to create a product uniquely yours. Enjoy the fruits of your labor all year long by capturing the essence of summer in every bite. Whether you’re a seasoned canning expert or just starting out, this recipe promises satisfaction and deliciousness in every jar.
Homemade Canned Salsa
Ingredients
Method
- In a large pot, mix garlic, onion, green peppers, jalapeno peppers, tomatoes, cumin, cilantro, oregano, salt, pepper, sugar, vinegar, and tomato paste.
- Bring the pot to a boil over medium heat, then reduce to a simmer for 10 to 15 minutes, stirring often until flavors meld and the salsa thickens.
- While the salsa simmers, place sterilized pint-size canning jars on a cookie sheet in an oven set to 200°F to warm them.
- Simmer the canning lids (not the rings) in a separate pan of hot water while the salsa cooks.
- Carefully take out a jar from the oven, fill it with the hot salsa, leaving 1/2-inch space at the top.
- Wipe the rim of the jar clean, place a lid on top, and screw on a ring securely.
- Process the jars in a boiling water or steam bath canner for 15 minutes, adjusting for altitude.
- Once processed, remove jars carefully from the water and let them cool to room temperature on a towel.
- Press the top of each lid; it should feel firm. If it pops back, refrigerate or reprocess the jar.
- Place each jar upside down on a kitchen towel overnight without disturbance for a tight seal.