Have you ever craved a warm, flaky treat that dances on the edge of savory and indulgent? Perhaps you find yourself dreaming about that perfect balance of cheese and garlic dance in a soft, pillowy pastry. If this sounds familiar, let me introduce you to your new favorite comfort food: Cheesy Garlic Cruffins! These delectable delights not only satiate your cravings but also bring a wave of nostalgia and warmth to your kitchen. So, let’s dive into how to craft these golden beauties, and learn why they’re the perfect treat for any occasion.
The Kitchen Conundrum
If you’ve ever attempted baking and been met with disappointing results, you’re not alone. I remember one particular Saturday morning, the sun streaming through the kitchen window, a recipe book spread open before me, and the lingering scent of fresh coffee in the air. Eagerly, I dove into an ambitious baking project—making croissants from scratch. Everything seemed straightforward until I faced a daunting mountain of dough that refused to rise, leaving me fuming over my wasted ingredients and time.
It was during this moment of culinary defeat that I stumbled upon the concept of a cruffin—a delightful cross between a croissant and a muffin. With Cheesy Garlic Cruffins, failures turn into triumphs. You don’t need to roll dough endlessly or face temperamental yeast; these cruffins deliver the comforting pastry experience without the fuss!
Here at Daily Golden Recipes, we understand the frustrations that come with baking, and we aim to empower you in the kitchen with easy, delicious recipes. By combining flavors that everyone loves—cheese and garlic—you’ll create a snack or breakfast option that delights the senses in every bite.
Why Cheesy Garlic Cruffin Works Wonders
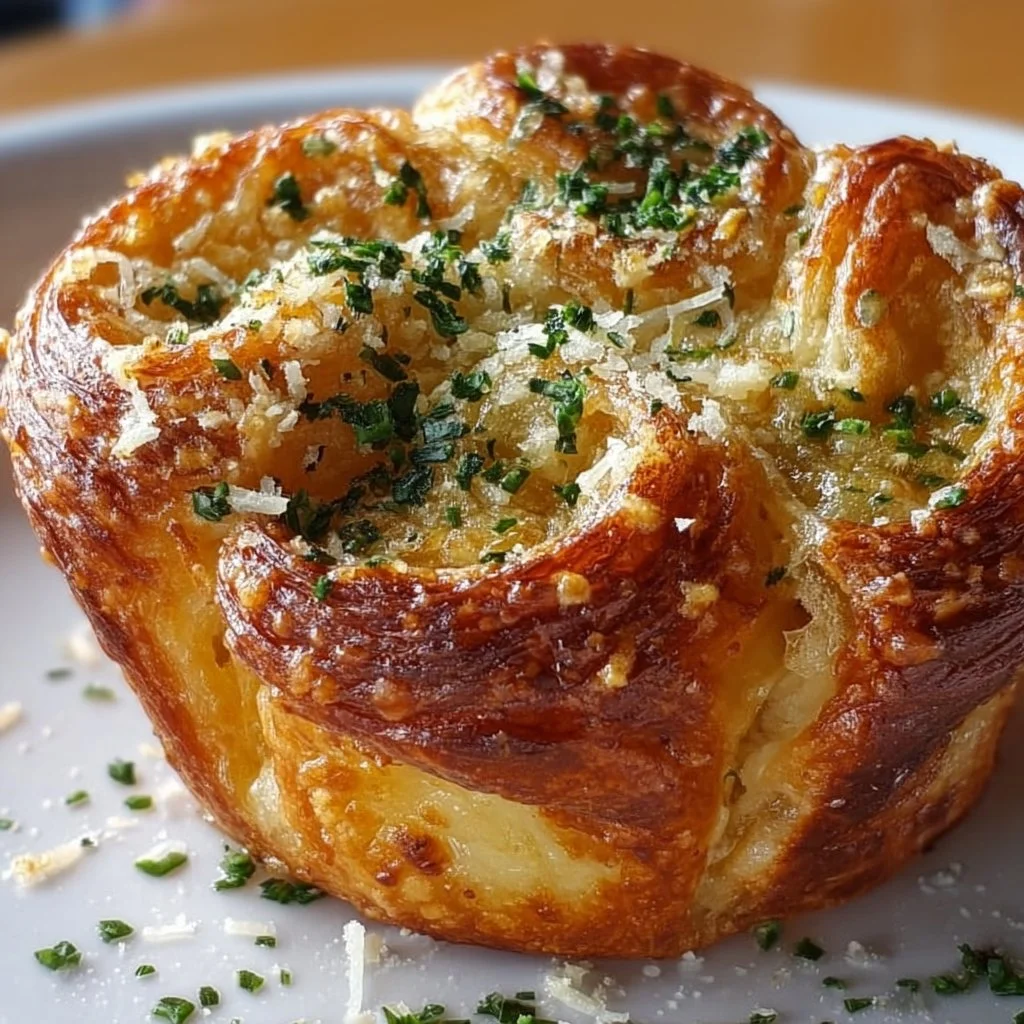
What makes the Cheesy Garlic Cruffin so special? For starters, this recipe takes the flaky, airy texture of a croissant and combines it with the robust flavors of cheese and garlic, resulting in a warm and mouthwatering treat. Each bite brings an incredible crunch from the crust, giving way to a gooey cheesy center that leaves you wanting more.
Not just a culinary treat, Cheesy Garlic Cruffins also bring people together, reminiscent of cozy gatherings filled with laughter and shared stories. Whether you’re hosting brunch, need an after-school snack, or want to liven up family dinners, these cruffins are a versatile favorite that everyone will adore.
Quick Answer: The secret to perfect Cheesy Garlic Cruffin is using cold, cubed butter, which creates those delectable flaky layers!
For an extra depth of flavor and texture, consider adding a sprinkle of herbs or spices into the cheese mix. This little tweak can elevate your Cheesy Garlic Cruffins to gourmet status. Plus, they’re easy to customize! For more delicious recipe ideas, check out our guides on Peanut Butter Chicken or Breakfast Sides.
Ingredients, Substitutions & Foolproof Steps
Ingredients List
- 2 cups all-purpose flour — Creates the structure for your cruffins; whole wheat can be a heartier alternative.
- 1 cup unsalted butter, cold and cubed — Essential for flaky layers; do not substitute with margarine for best results.
- 1/2 cup warm milk — Activates the yeast; any non-dairy milk can work here.
- 2 tablespoons sugar — Feeds the yeast and adds a hint of sweetness; coconut sugar is a great substitute.
- 1 packet (2 1/4 teaspoons) active dry yeast — The magic ingredient that makes your cruffins rise.
- 1 teaspoon salt — Enhances all the flavors; sea salt is preferable.
- 1 cup shredded cheese (cheddar or mozzarella) — Provides delicious melty goodness; feel free to experiment with different cheese types!
- 3 cloves garlic, minced — Infuses the cruffins with aromatic flavor; or use garlic powder in a pinch.
- 1 egg (for egg wash) — Gives a beautiful golden finish; a vegan option is to use non-dairy milk as a wash.

Directions / Steps
- In a bowl, combine warm milk and sugar; sprinkle yeast on top and let it sit for 5 minutes until frothy.
- In a large bowl, mix flour and salt. Add cold butter and cut into the flour until it resembles coarse crumbs.
- Pour in the yeast mixture and mix until a dough forms. Knead for about 5 minutes until smooth.
- Let the dough rise in a warm place for about 1 hour, until doubled in size.
- Roll out the dough into a rectangle, sprinkle minced garlic and cheese evenly over it, and fold layers.
- Cut into squares and place in greased muffin tins, shaping into a cruffin form.
- Let rise for another 30 minutes, until puffy and airy.
- Brush with beaten egg and bake at 375°F (190°C) for 15-20 minutes until golden brown.
- Cool slightly before serving to allow the cheese to set slightly.
Common Mistakes to Avoid
- Not kneading enough: Ensure you knead until the dough is smooth; this helps develop gluten, giving your cruffins structure.
- Incorrect yeast temperature: Make sure your milk is warm, not hot—boiling milk will kill the yeast!
- Overfilling with cheese: While it’s tempting to add more cheese, too much will ooze out during baking and leave a mess.
Pro Tips
- Double the recipe: If you find yourself making these on repeat, consider doubling the batch; they freeze exceptionally well!
- Add herbs: Incorporate fresh or dried herbs to enhance flavor. Thyme and parsley pair beautifully with garlic and cheese.
- Experiment: Don’t hesitate to try different cheeses or toppings for unique flavors.
For a cozy side dish, why not pair these with Homemade Garlic Bread or enjoy them as a delightful starter before your main meal?
Serving, Storage & Freezer Tips
How to Serve Cheesy Garlic Cruffin
Serve warm, drizzled with a small amount of herb-infused olive oil or a dollop of marinara sauce for dipping. They make a fantastic accompaniment to a hearty soup or salad for a complete meal.
How to Store Cheesy Garlic Cruffin
Store any leftovers in an airtight container at room temperature for up to 2 days or in the refrigerator for up to a week to maintain freshness.
Can You Freeze Cheesy Garlic Cruffin?
Absolutely! Freeze individually wrapped cruffins in freezer-safe bags for up to a month. To reheat, simply pop them in the oven at 350°F (175°C) for about 10-15 minutes, and enjoy warm!
Reflecting on baking with family, I remember using recipes that melded tradition with creativity. This cruffin recipe embodies that spirit, allowing you to create something special amidst shared laughter and delicious aromas.
Frequently Asked Questions
Can I substitute the cheese?
Yes! Feel free to mix and match different types of cheese. Pepper jack, gouda, or a mix of various cheeses can add an exciting twist to your Cheesy Garlic Cruffins.
What’s the best way to reheat these cruffins?
For optimal texture, reheat them in the oven rather than the microwave. Ovens help retain the crispiness of the crust, making them taste freshly baked.
Can I use whole wheat flour instead of all-purpose flour?
Certainly! Whole wheat flour will yield a denser cruffin, providing more fiber and nutrients; however, you might want to mix it with all-purpose flour for a lighter texture.
Are Cheesy Garlic Cruffins suitable for a vegetarian diet?
Absolutely! All the ingredients in this recipe are vegetarian-friendly. Just ensure your cheese is rennet-free if you’re looking for vegetarian options.
Conclusion
In closing, the Cheesy Garlic Cruffin delivers both warmth and comfort. This delightful recipe offers a way to bring your loved ones together, evoking memories of cozy kitchens filled with laughter and delicious aromas wafting through the air. If this recipe reminds you of someone you love, share it with them. Your memories keep recipes alive.
Now, it’s your turn to fill the house with the enticing scent of cheese and garlic. Head over to your kitchen and make these Cheesy Garlic Cruffins today!
Cheesy Garlic Cruffins
Ingredients
Method
- In a bowl, combine warm milk and sugar; sprinkle yeast on top and let it sit for 5 minutes until frothy.
- In a large bowl, mix flour and salt. Add cold butter and cut into the flour until it resembles coarse crumbs.
- Pour in the yeast mixture and mix until a dough forms. Knead for about 5 minutes until smooth.
- Let the dough rise in a warm place for about 1 hour, until doubled in size.
- Roll out the dough into a rectangle, sprinkle minced garlic and cheese evenly over it, and fold layers.
- Cut into squares and place in greased muffin tins, shaping into a cruffin form.
- Let rise for another 30 minutes, until puffy and airy.
- Brush with beaten egg and bake at 375°F (190°C) for 15-20 minutes until golden brown.
- Cool slightly before serving to allow the cheese to set slightly.