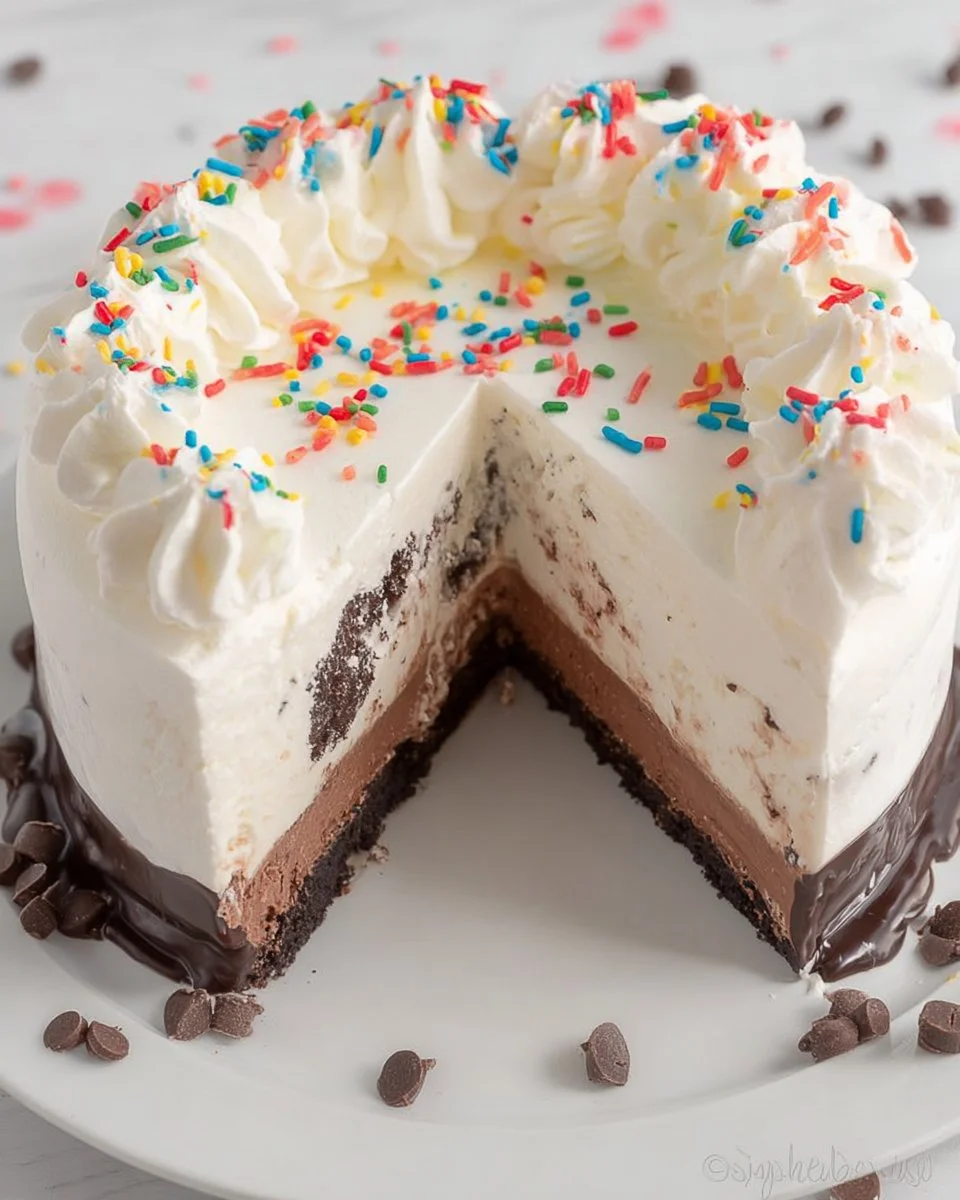
Copycat Dairy Queen Ice Cream Cake
Creating sweet, nostalgic memories with loved ones often leads us to indulge in our favorite desserts. However, those moments can become overshadowed by kitchen frustrations and the sheer effort it takes to prepare a delicious treat, especially as we juggle busy schedules and family needs. This is where our Copycat Dairy Queen Ice Cream Cake comes to the rescue. With layers of chocolate and vanilla ice creams, mixed with chocolate sandwich cookies and fudge, this dessert is not only a feast for the eyes but is also a soothing remedy for cooking fatigue. It’s time-saving and generously portioned, perfect for feeding a crowd while sticking to your nutrition goals.
Kitchen Frustration That Makes This Recipe a Lifesaver
We’ve all experienced those moments in the kitchen where the joy of cooking dips into frustration. Whether you’re struggling with time constraints or looking to avoid waste, the drive to prepare a delightful dessert can sometimes fizzle out. This Copycat Dairy Queen Ice Cream Cake addresses that very frustration. Imagine gathering around the table, everyone excited for dessert, and you’ve effortlessly created more than just a cake; you’ve crafted a treasured memory.
This recipe allows you to engage with your family while eliminating the stress of complicated ingredients and lengthy procedures. It’s all about convenience and enjoyability, making it a remarkably user-friendly option. So, gather your favorite ingredients and prepare to make a cake that binds flavors and loved ones together—it’s a practical tip to simplify your dessert preparations.
Why This Copycat Dairy Queen Ice Cream Cake Works So Well
Quick Answer: Rich layers of chocolate and vanilla ice cream complemented by cookie crumbles and fudge sauce create a perfect balance of flavors and textures, making this cake a favorite among family and friends.
This Copycat Dairy Queen Ice Cream Cake shines with its combination of soft and creamy textures. The layers of chocolate and vanilla ice cream meld beautifully with crunchy chocolate sandwich cookies, providing that satisfying contrast we all crave. The warm fudge sauce drizzled between layers adds a generous touch of sweetness, perfectly complementing the ice creams without overwhelming them.
Not only does this cake hit all the right flavor notes, but it also helps you save on prep time and costs—a valuable asset in any family kitchen. It meets the health-conscious criteria with generous portions while maintaining a feel-good factor for dessert nights. Whether you are hosting a party or simply treating your family, this recipe brings joy and satisfaction without overwhelming your schedule.
{image_template}
Ingredients, Substitutions & Foolproof Tips
- 20 chocolate sandwich cookies with frosting (roughly chopped) – Adds a perfect crunch and chocolatey flavor.
- ½ cup thick chocolate fudge sauce (warmed) – Enhances the richness and moisture of the cake.
- 6 cups chocolate ice cream (softened but not melted) – The main flavor component, rich and creamy.
- 6 cups vanilla ice cream – Balances the chocolate with its sweet simplicity.
- 1 cup thick chocolate fudge sauce (or chocolate ganache) – For layering and drizzling.
- 2 cups heavy whipping cream – Creates delicious whipped cream for decoration.
- ⅓-½ cup powdered icing sugar – Sweetens the whipped cream without being overpowering.
- 1 teaspoon vanilla – Adds depth to the whipped cream.
- Sprinkles for garnish – For an eye-catching presentation.
- Chocolate crumbles – Additional texture and visual appeal.
Step-by-Step Directions
Prepare the Base: In a mixing bowl, combine the roughly chopped chocolate sandwich cookies with the warm fudge sauce. This will create a rich, chocolaty crust for your cake. Let it sit for about 5 minutes while you prepare the ice cream.
Layer the Chocolate Ice Cream: Spread 3 cups of softened chocolate ice cream in the bottom of a 9×13 inch baking dish, smoothing it out evenly across the pan. Freeze for about 30 minutes until slightly firm.
Add the Cookie Mixture: Carefully layer the cookie and fudge mixture on top of the chocolate ice cream. Use a spatula to evenly distribute it.
Layer the Vanilla Ice Cream: Next, spread 3 cups of softened vanilla ice cream on top of the cookie layer, smoothing it out once more. Freeze for about 30 minutes.
Repeat with Chocolate Fudge Sauce: Drizzle a cup of thick chocolate fudge sauce over the vanilla layer and return to the freezer for 15 minutes to firm up.
Whip the Cream: In a mixing bowl, whip the heavy cream with powdered sugar and vanilla until soft peaks form. This will take about 3-5 minutes on medium speed.
Top with Whipped Cream: Once the layers are firm, remove the cake from the freezer and spread the whipped cream over the top generously for a smooth finish.
Add Final Touches: Garnish with colorful sprinkles and chocolate crumbles to make the cake fun and festive. Your masterpiece is ready!
Freeze Again: Return the completed cake to the freezer for at least 4 hours, or preferably overnight, to ensure firm texture.
Common Mistakes to Avoid & Pro Tips
Mistake: Not allowing ice cream to soften.
Fix: Take the ice cream out of the freezer to soften for about 10-15 minutes before layering.Mistake: Overpacking the layers.
Fix: Ensure that the layers are spread evenly; too much in one layer can cause instability.Mistake: Fudging the fudge.
Fix: Always warm the fudge sauce slightly; this allows for better layering without creating ice crystals.
Pro Tips:
- Let the whipped cream sit for a few minutes before spreading to make it easier to layer.
- Double the cookie filling if you want an extra crunch.
- Use colorful sprinkles specific to the occasion for an added festive touch.
Serving, Storage & Freezer Guide
How to Serve Copycat Dairy Queen Ice Cream Cake
This cake serves beautifully with a presentation that delights both the eyes and taste buds. Simply slice into squares and serve on chilled plates for an extra touch of elegance. For gatherings, encourage guests to add toppings like chocolate syrup or extra crumbles, making it a customizable experience.
How to Store Copycat Dairy Queen Ice Cream Cake
Store your Copycat Dairy Queen Ice Cream Cake in the freezer in an airtight container or covered with plastic wrap. Ensure you do not cover the whipped cream with anything that could smudge it—keeping it luscious is key.
Can You Freeze Copycat Dairy Queen Ice Cream Cake?
Absolutely! This ice cream cake is perfect for freezing. Ensure it is tightly wrapped, and it will maintain its flavor and texture. It can last in the freezer for up to 2 weeks, making it an excellent option for meal planning or unexpected guests.
Frequently Asked Questions
What size of dish is best for this recipe?
Using a 9×13 inch baking dish is perfect for this recipe, providing ample space for layering ice creams and cookies without overflowing.
Can I substitute the chocolate ice cream?
Yes, you can use any ice cream flavor you enjoy. Just keep in mind that flavor combinations may alter the final taste of the cake, so mix and match according to your preference!
Can this recipe be made ahead of time?
Absolutely! In fact, it’s best made in advance. Letting it sit in the freezer overnight allows the flavors to meld perfectly, making it an ideal dessert for any occasion.
How can I make this dairy-free?
You can use dairy-free ice creams and coconut cream as a substitute for the whipped cream, making this cake suitable for those with dietary restrictions!
Conclusion
The Copycat Dairy Queen Ice Cream Cake encapsulates the love and joy of family gatherings, offering a delicious solution to those culinary headaches we all encounter. It’s budget-friendly, nutrient-friendly, and above all, a true delight to share with your loved ones. If this recipe reminds you of someone you love, share it with them. Your memories keep recipes alive.

Copycat Dairy Queen Ice Cream Cake
Ingredients
Method
- In a mixing bowl, combine the roughly chopped chocolate sandwich cookies with the warm fudge sauce. Let it sit for about 5 minutes while you prepare the ice cream.
- Spread 3 cups of softened chocolate ice cream in the bottom of a 9×13 inch baking dish, smoothing it out evenly across the pan. Freeze for about 30 minutes until slightly firm.
- Layer the cookie and fudge mixture on top of the chocolate ice cream using a spatula to evenly distribute it.
- Spread 3 cups of softened vanilla ice cream on top of the cookie layer, smoothing it out once more. Freeze for about 30 minutes.
- Drizzle a cup of thick chocolate fudge sauce over the vanilla layer and return to the freezer for 15 minutes to firm up.
- In a mixing bowl, whip the heavy cream with powdered sugar and vanilla until soft peaks form (about 3-5 minutes on medium speed).
- Remove the cake from the freezer and spread the whipped cream generously over the top.
- Garnish with colorful sprinkles and chocolate crumbles to make the cake fun and festive.
- Return the completed cake to the freezer for at least 4 hours, or preferably overnight, to ensure firm texture.