When the busy weekdays come crashing in and the continuous cycle of family commitments, work responsibilities, and meal planning weigh you down, it’s easy to feel overwhelmed in the kitchen. You come home after a long day, desperately seeking something healthy yet quick to prepare. Enter the Hummus Recipe (Easy, Authentic, Creamy and Smooth)—your new favorite solution for a protein-packed, meal-prep friendly option that checks all the boxes for health-conscious families striving for balance. This recipe not only brings a delicious taste to the table but also supports your nutrition goals, making it an essential addition to your healthy lifestyle.
One evening, I found myself staring into the abyss of my refrigerator, sifting through an array of random ingredients and contemplating how I would somehow turn them into a nutritious dinner for my family. As a health-conscious parent, finding recipes that were both quick and wholesome had become a real challenge. In those moments, I often turned to my trusty hummus. It’s amazing how a few simple ingredients can transform into a creamy delight that pleases even the pickiest of eaters. With the Hummus Recipe (Easy, Authentic, Creamy and Smooth), I’ve transformed what was once a kitchen frustration into a beloved staple in our family meals.
What I love most is its versatility. Hummus pairs well with just about anything: vegetables, warm pita, or even as a spread on sandwiches. It seamlessly fits into our meal prep routine, allowing us to savor it all week long while keeping our nutrition in check. If you ever feel like your culinary creativity is stuck in a rut, remember that a little homemade hummus can spark joy and nourish your family.
The beauty of the Hummus Recipe (Easy, Authentic, Creamy and Smooth) lies in its harmonious blend of simplicity and flavor. Using fresh ingredients not only elevates the taste but transforms this dish into a heart-healthy powerhouse loaded with protein. The texture is creamy, making it the perfect dip or spread, and with each bite, you unlock a world of flavor layered with garlic, tahini, and zesty lemon, all coming together to support your blood sugar goals.
Moreover, this recipe saves time. Preparing hummus from scratch can be done in under 30 minutes if you use canned chickpeas or about two hours if you choose to soak dried ones overnight. Both choices provide flexibility to meet your schedule, be it meal prep Sunday or a weekday snack attack.
Quick Answer: The secret to perfect Hummus Recipe (Easy, Authentic, Creamy and Smooth) is the smooth pureeing of chickpeas combined with ice cubes for that creamy texture.
INGREDIENTS, SUBSTITUTIONS & FOOLPROOF STEPS
3 cups cooked chickpeas — The star ingredient that packs protein and fiber. For convenience, you may opt for canned chickpeas, but homemade is worth it.
1 1/2 teaspoons baking soda — A trick to help remove chickpea skins, ensuring a smoother texture. Omit if using canned chickpeas.
1 to 2 garlic cloves (minced) — Adds a lovely depth of flavor; adjust to taste.
2 ice cubes — This surprising addition helps achieve that creamy consistency everyone craves.
1/3 cup tahini — Provides richness and a nutty flavor; substitute with sunflower seed butter for a nut-free version.
1/2 tsp kosher salt — Enhances flavors; start with less and adjust to taste.
Juice of 1 lemon — Brightens the flavors and balances the dish; adds vitamin C for a nutritious boost.
Arbequina extra virgin olive oil — Drizzle on top before serving; it enhances richness and adds healthy fats.
Sumac (to serve) — Optional, but gives a lovely tangy finish; a sprinkle elevates the presentation.
DIRECTIONS / STEPS
Soak the chickpeas: If using canned chickpeas, you can skip to step 4. Place dried chickpeas in a large bowl, cover with water, and soak overnight.
Cook the chickpeas: The next day, drain the chickpeas and cover with 2 inches of water. Bring to a boil over high heat, then reduce heat to a simmer for 1 1/2 to 2 hours. Ensure the chickpeas are tender before draining.
Remove the skins: Add 1 1/2 teaspoons of baking soda to the water with the chickpeas. Let sit for a few minutes, then turn off the heat. Drain the chickpeas into a colander and rinse under running water, gently rubbing to remove the skins.
Puree the chickpeas: In a food processor equipped with an S-blade, combine the cooked (or canned) chickpeas and minced garlic. Blend until you have a smooth powder-like consistency, about 2 minutes.
Finish the hummus: With the food processor running, add the 2 ice cubes, tahini, salt, and lemon juice through the tube. Process for 4 to 5 minutes until silky smooth. If too thick, add water 1 tablespoon at a time until desired consistency is reached.
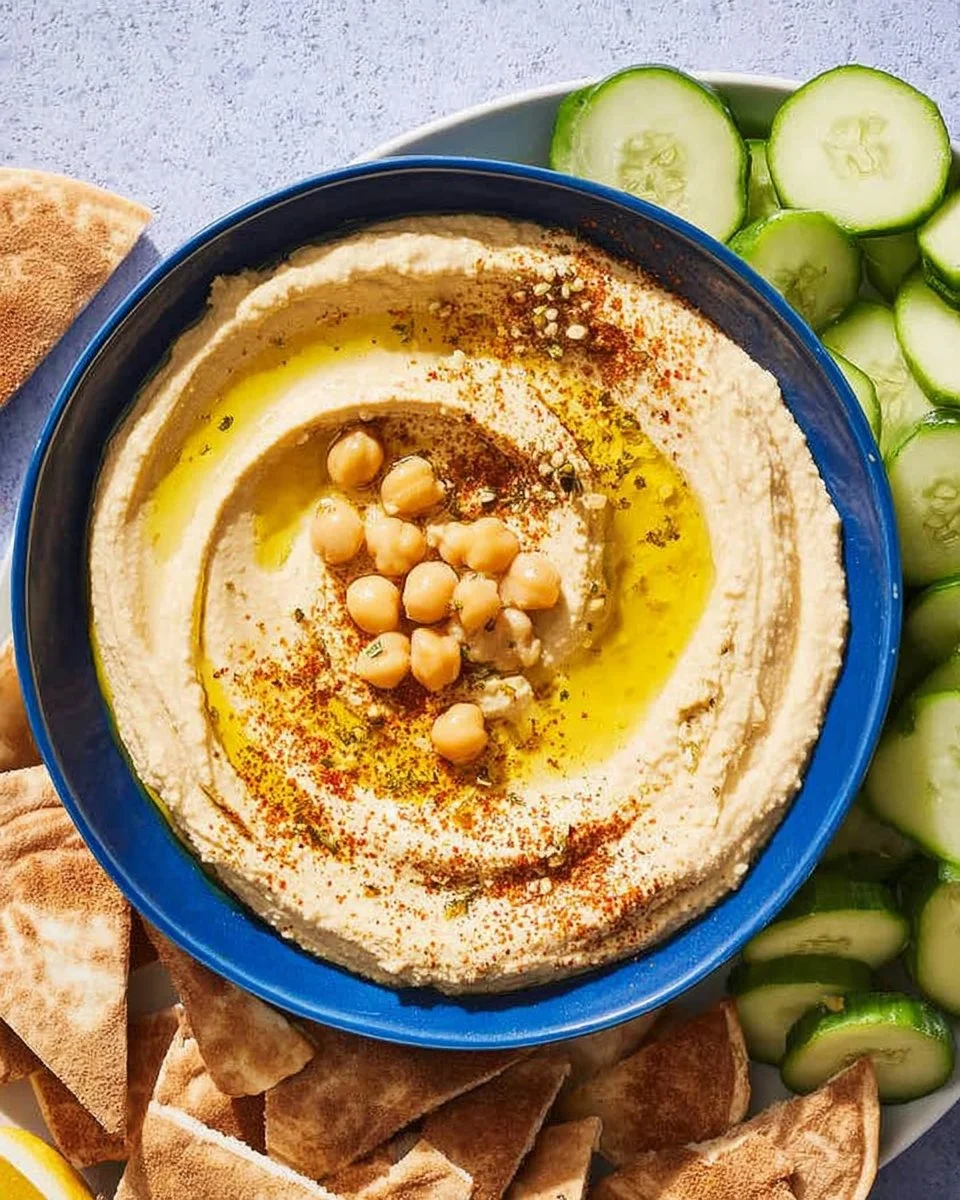
Garnish and serve: Spread the hummus in a serving bowl, drizzle with extra virgin olive oil, and top with a few whole chickpeas if desired. Sprinkle with sumac for extra flavor, and enjoy with warm pita wedges and fresh veggies.

COMMON MISTAKES TO AVOID
- Skipping the soaking process: While canned chickpeas are convenient, soaking dried chickpeas provides a deeper flavor and better texture.
- Not removing chickpea skins: Skinning your chickpeas may be tedious, but it’s essential for a creamier hummus.
- Over-processing: Blend until smooth but don’t overdo it. Too much mixing can lead to a less desirable texture.
- Adjusting flavors: Always taste your hummus before serving. It’s your opportunity to add more salt, lemon, or garlic to fit your palate.
- Using old ingredients: Fresh tahini and lemon juice can make a dramatic difference in flavors—don’t compromise on quality.
PRO TIPS
- Use chilled water to adjust consistency for an even creamier texture.
- Let your hummus rest for at least 30 minutes before serving. This allows flavors to meld beautifully.
- If you prefer a richer flavor, substitute half the tahini with Greek yogurt—this adds creaminess, protein, and a hint of tang.
- Experiment with spices like smoked paprika or cumin to find your favorite flavor profile.
SERVING, STORAGE & FREEZER TIPS
How to Serve Hummus Recipe (Easy, Authentic, Creamy and Smooth)
Serve this delightful hummus with an array of colorful veggies, warm pita, or even as part of your charcuterie board. The creamy texture makes it a fantastic complement to grilled meats or as a spread for wraps.
How to Store Hummus Recipe (Easy, Authentic, Creamy and Smooth)
Store excess hummus in an airtight container in the refrigerator for up to a week. Just be sure to cover the surface with a drizzle of olive oil to keep it fresh.
Can You Freeze Hummus Recipe (Easy, Authentic, Creamy and Smooth)?
Yes, you can freeze hummus! Portion it into freezer-safe containers and it can last up to 3 months—just thaw and stir when you’re ready to enjoy a quick, healthy snack. Add a sprinkle of fresh lemon juice for a flavor boost upon defrosting.
Remember that serving hummus with your family is more than just a meal; it creates connections and memories. Enjoying this delightful dish together can spark conversations around health, nutrition, and the joys of cooking.
FAQ SECTION
Can I use dried chickpeas instead of canned?
Yes, using dried chickpeas can give you a richer flavor. Just be sure to soak and cook them properly to achieve a creamy consistency.
Is this hummus recipe vegan-friendly?
Absolutely! This Hummus Recipe (Easy, Authentic, Creamy and Smooth) contains no animal products, making it perfect for a vegan diet.
How can I make hummus spicier?
If you enjoy a kick, add jalapeños or sprinkle cayenne pepper into your hummus as you blend it. This adds a delightful heat without overpowering the flavor.
What can I substitute for tahini if I have a nut allergy?
If you have a nut allergy, try sunflower seed butter as an excellent alternative. It offers a similar texture without the risk.
CONCLUSION
Creating the Hummus Recipe (Easy, Authentic, Creamy and Smooth) can transform your meal planning from a chore into a joy. It offers a unique balance between deliciousness and nutrition, serving as an ideal solution for time-constrained families seeking healthy options. Through the simple yet rich combination of chickpeas, tahini, and lemon, you’re not just preparing a dish; you’re fostering connection with your loved ones. This recipe has the potential to nourish your body and reunite your family around the table.
“If this recipe reminds you of someone you love, share it with them. Your memories keep recipes alive.”

Hummus Recipe
Ingredients
Method
- Soak the chickpeas: If using canned chickpeas, skip to step 4. Place dried chickpeas in a bowl, cover with water, and soak overnight.
- Cook the chickpeas: Drain the soaked chickpeas and cover with 2 inches of water. Bring to a boil, then simmer for 1.5 to 2 hours until tender.
- Remove the skins: Add baking soda to the chickpeas, let sit, then rinse under running water while rubbing gently to remove skins.
- Puree the chickpeas: In a food processor, blend the cooked (or canned) chickpeas and minced garlic until powder-like.
- Finish the hummus: With the processor running, add ice cubes, tahini, salt, and lemon juice. Process for 4-5 minutes until smooth. Add water if too thick.
- Garnish and serve: Spread hummus in a bowl, drizzle with olive oil, and sprinkle with sumac if desired. Serve with pita and veggies.