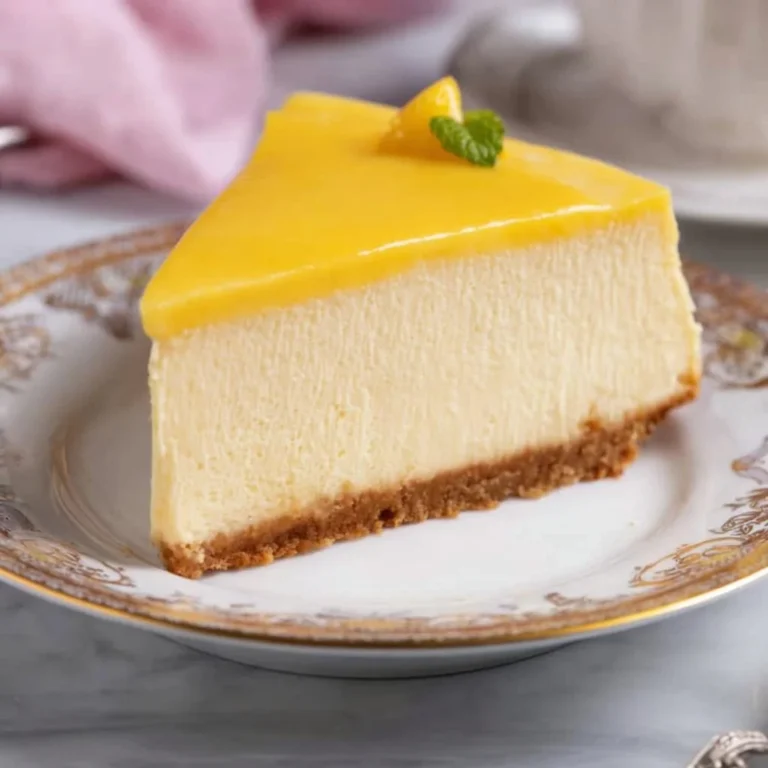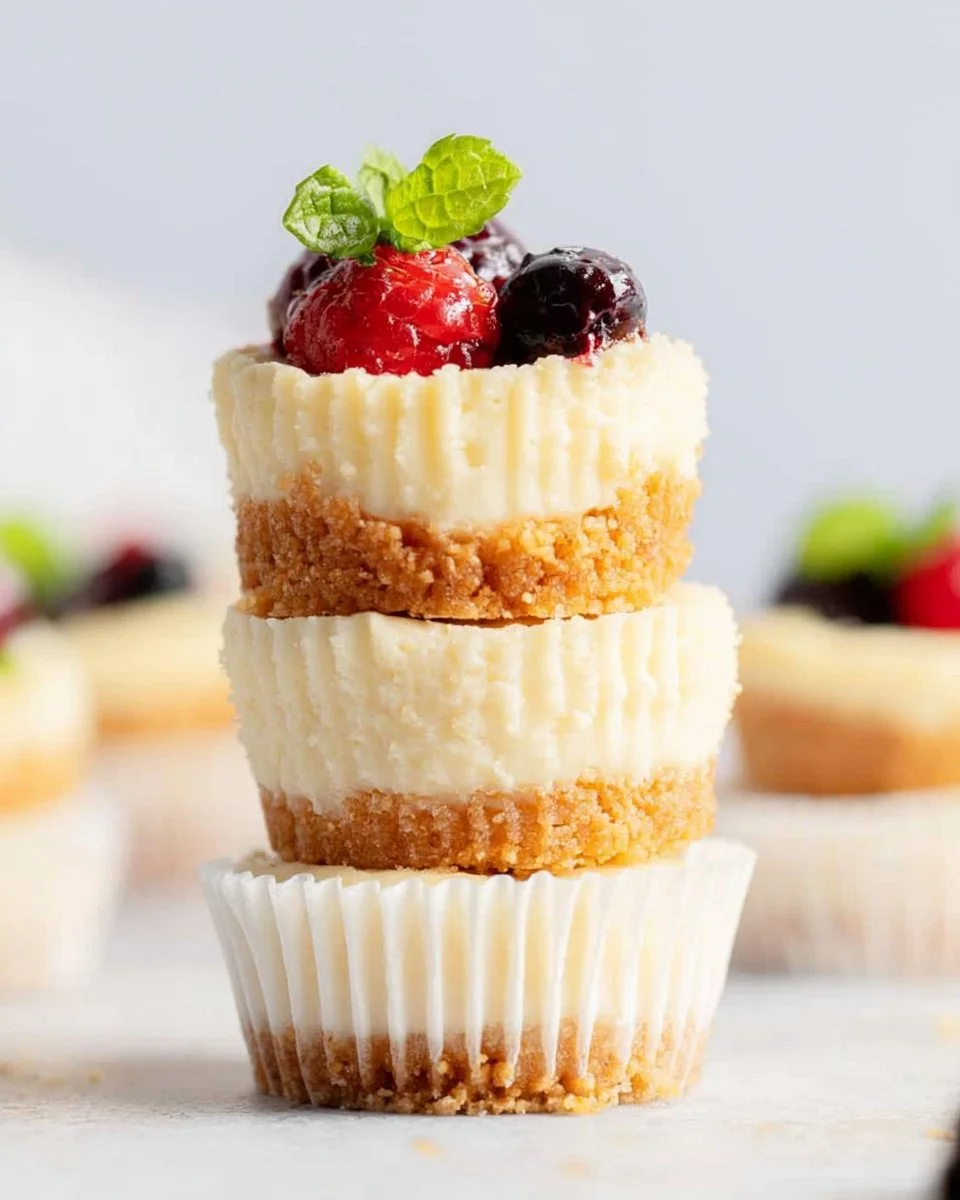
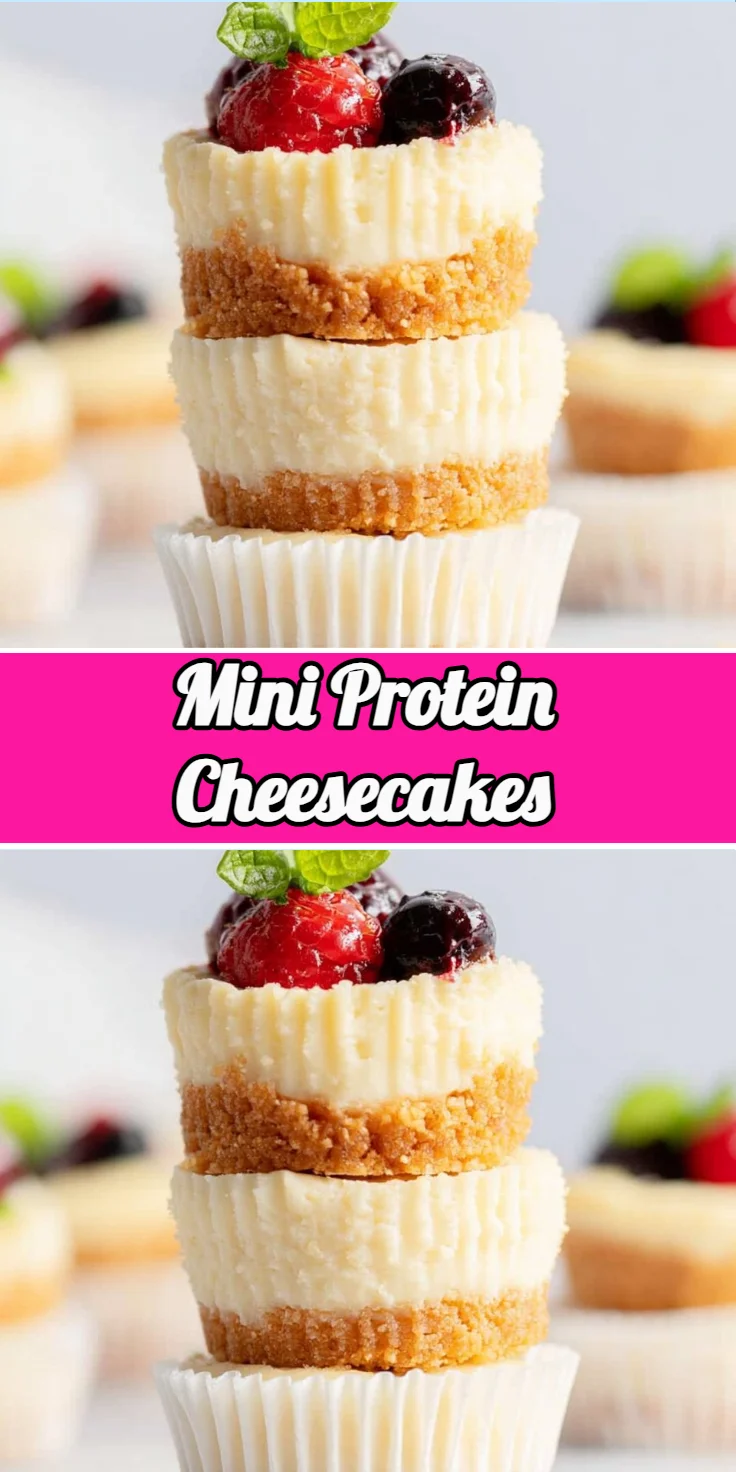
Mini Protein Cheesecakes
When it comes to satisfying sweet cravings while keeping your health goals in check, nothing beats a mini cheesecake. Imagine silky-smooth cream cheese mingling with tangy Greek yogurt, enveloped in a crisp, buttery graham cracker crust. These delightful treats are perfect for busy families seeking quick, nutritious desserts that everyone will love, and they also make an impressive addition to gatherings or a delightful weeknight treat. With their rich flavor and protein-packed ingredients, they’re not just a dessert, but a wholesome indulgence. Easier to make than you might think, these mini protein cheesecakes can be prepared in advance, making them a stress-free option for any occasion. Get ready to impress your friends and family with a dessert that satisfies both the sweet tooth and the health-conscious!
Quick Answer
These mini protein cheesecakes are a delicious and nutritious dessert option, blending creamy textures with rich flavors. They are perfect for health-conscious individuals and families looking for a quick yet satisfying treat.
Why You’ll Love This Recipe
There’s so much to adore about these mini protein cheesecakes! They strike the perfect balance between indulgence and health, featuring a creamy filling supported by a crunchy graham cracker crust. Not only are they a fantastic dessert option, but they also offer the convenience of portion control, making them great for meal prep. Pack them for lunches or serve them at family gatherings; their appeal is universal!
- High in protein for lasting satisfaction.
- Perfectly portioned for individual servings.
- Great for meal prepping ahead of time.
- Light and refreshing with a zesty hint of lemon.
- Family-friendly appeal that kids will love.
- Versatile enough to customize with different toppings.
- Quick and easy to prepare with minimal ingredients.
What Makes This Recipe Special
This recipe combines the richness of cream cheese with the health benefits of Greek yogurt, creating a delectable filling that feels both comforting and indulgent. The addition of lemon juice and zest perfectly balances the sweetness, enhancing the flavors and cutting through the creaminess. It’s a simple recipe that’s incredibly satisfying, and its portion-controlled mini size makes it a hit at any gathering. Plus, the straightforward preparation allows even novice bakers to shine!
Kitchen Tools You’ll Need
- Food Processor – To easily crush graham crackers into fine crumbs.
- Handheld Electric Mixer – For smoothly blending the cheesecake filling.
- Cupcake Tin – Essential for baking mini cheesecakes.
- Measuring Cups and Spoons – To ensure precise ingredient portions.
- Mixing Bowls – Needed for combining the crust and filling.
- Whisk – Handy for incorporating ingredients smoothly.
Ingredients
graham cracker crumbs: Creates a delicious base with a buttery crunch.
salted butter: Adds richness and helps bind the crust together.
cream cheese: Provides a creamy texture and rich flavor.
Greek yogurt: Offers creaminess and a boost of protein.
granulated sugar: Sweetens the filling for the perfect balance.
egg: Helps to set and enrich the cheesecake filling.
vanilla extract: Enhances overall flavor with depth.
lemon juice: Adds a bright, zesty note that complements the creaminess.
lemon zest: Optional for an extra citrus kick.
arrowroot starch or cornstarch: Acts as a thickening agent for a firmer filling.
Ready to cook? Scroll to the recipe card below for exact measurements.
How to Make Mini Protein Cheesecakes
STEP 1. Preheat the oven. Set your oven to 350°F and line a cupcake tin with 12 liners.
STEP 2. Prepare the crust. Add graham crackers to a food processor and pulse until they are crumbs. Add in melted butter and pulse until combined.
STEP 3. Assemble the crust. Divide crumbs evenly amongst muffin liners and use your fingers to flatten and pack the crumbs on the bottom.
STEP 4. Bake the crust. Bake for 5-6 minutes. Remove from oven and let cool for 5-10 minutes while you make the filling.
STEP 5. Make the filling. In a mixing bowl, beat cream cheese with a handheld electric mixer until smooth.
STEP 6. Add remaining ingredients. Mix in Greek yogurt, egg, egg yolk, sugar, vanilla extract, lemon juice, lemon zest, and arrowroot powder until smooth for about 30-60 seconds on the lowest setting.
STEP 7. Fill the liners. Divide the filling evenly among the muffin liners.
STEP 8. Bake the cheesecakes. Bake for 17-20 minutes or until the filling has just set; it should not jiggle or look wet.
STEP 9. Cool and chill. Let cool for 30 minutes at room temperature before transferring to the refrigerator. Chill for at least 3 hours.
STEP 10. Serve. Top with fresh berries and small mint leaves. Enjoy!
Why This Recipe Works
The combination of cream cheese and Greek yogurt creates a light yet satisfying filling that’s both creamy and protein-packed. The crust adds a delightful crunch that contrasts perfectly with the smooth texture of the cheesecake. Utilizing low heat helps the filling set without cracking, while the cooling process allows flavors to develop fully. This comprehensive method ensures each bite is a balanced experience of flavors and textures.
Pro Tips for Best Results
- Allow the cream cheese to soften at room temperature for a smoother filling.
- Mix the filling on low speed to avoid air bubbles and ensure even baking.
- Try adding berries or chocolate chips to the filling for added flavor variations.
- For an extra touch, serve with a dollop of whipped cream on top.
- Use fresh berries as a topping to brighten the presentation and flavor.
Common Mistakes to Avoid
Mistake: Overmixing the filling.
Why it happens: It’s easy to get carried away with the mixer, but this can incorporate too much air.
How to fix it: Mix just until smooth on the lowest speed to prevent air bubbles.
Mistake: Not cooling before refrigerating.
Why it happens: Patrons may want to speed up the process.
How to fix it: Let sit at room temperature for 30 minutes before chilling to maintain texture.
Mistake: Using cold ingredients.
Why it happens: Many people reach for ingredients straight from the fridge.
How to fix it: Ensure all ingredients are at room temperature before mixing to prevent lumps.
Recipe Variations
- Add a tablespoon of cocoa powder for a chocolate twist.
- Incorporate different flavor extracts like almond or lemon.
- Top with a layer of homemade fruit compote.
- Use nut-based crust for a gluten-free version.
- Substitute honey or maple syrup for granulated sugar.
Nutrition Highlights
| Nutrient | Per Serving |
|---|---|
| Protein | High protein content, great for muscle recovery. |
| Fiber | Contains fiber from the graham cracker crust. |
| Carbs | Provides a balanced level of carbohydrates for energy. |
| Healthy Fats | Includes healthy fats from the yogurt and cream cheese. |
| Calories | Calorie-conscious dessert suitable for weight management. |
How to Serve Mini Protein Cheesecakes
- Drizzle with honey or chocolate sauce.
- Top with seasonal fresh fruits like strawberries or blueberries.
- Garnish with mint leaves for a fresh finish.
- Serve alongside a scoop of low-fat ice cream.
- Present on a decorative platter for gatherings.
Best Occasions for This Recipe
- Weeknight dinners for a sweet finish.
- Holidays as a lighter dessert option.
- Meal prep for healthy snacking.
- Family gatherings and celebrations.
- Potlucks where everyone will appreciate a healthy sweet treat.
Make Ahead & Storage
Can This Be Meal Prepped
Absolutely! These mini cheesecakes are perfect for meal prep. Simply prepare them ahead of time, chill in the refrigerator, and serve as needed.
Storing Leftovers
Leftover cheesecakes can be stored in an airtight container in the refrigerator for up to a week.
Freezing
You can freeze the cheesecakes for longer storage. Wrap each cheesecake tightly in plastic wrap and store in a freezer-safe container for up to 2 months.
Reheating
To enjoy frozen cheesecakes, thaw them in the fridge overnight before serving. Do not reheat, as that may alter the texture.
Creative Ways to Use Leftovers
Leftover cheesecakes can be transformed into delightful treats: break them up and layer in jars with yogurt and granola, fold into indulgent oatmeal, or serve as a flavorful addition to smoothie bowls.

FAQs
Can I make these mini cheesecakes dairy-free?
Yes, you can substitute cream cheese and Greek yogurt with dairy-free alternatives like coconut cream and almond milk yogurt.
How long do the mini cheesecakes need to chill?
They should chill for at least 3 hours to firm up properly and allow flavors to meld.
Can I use a different crust?
Absolutely! Options like crushed nuts or gluten-free cookies work great as alternatives for the graham cracker crust.
What’s the best way to store the cheesecakes?
Keep them in an airtight container in the refrigerator for up to one week or freeze them for longer storage.
Can I use flavored Greek yogurt?
Yes, flavored Greek yogurt can enhance the flavor of your cheesecake, just be mindful of the sugar content.
Save This Recipe for Later
If you love this recipe, be sure to save it to your Pinterest boards or share it with your friends. It’s a must-try for anyone who appreciates a healthier dessert option!
Final Thoughts
This mini protein cheesecake recipe is the perfect blend of indulgence and health, making it a fantastic choice for dessert lovers seeking a nutritious twist. Try making them for your next gathering, or enjoy them at home as a convenient snack. Don’t forget to save the recipe for later or explore other healthy dessert options!

Mini Protein Cheesecakes
Ingredients
Method
- Preheat the oven to 350°F and line a cupcake tin with 12 liners.
- Add graham crackers to a food processor and pulse until they are crumbs. Add in melted butter and pulse until combined.
- Divide crumbs evenly among muffin liners and use your fingers to flatten and pack the crumbs on the bottom.
- Bake for 5-6 minutes. Remove from oven and let cool for 5-10 minutes.
- In a mixing bowl, beat cream cheese with a handheld electric mixer until smooth.
- Mix in Greek yogurt, egg, sugar, vanilla extract, lemon juice, lemon zest, and arrowroot powder until smooth.
- Divide the filling evenly among the muffin liners.
- Bake for 17-20 minutes or until the filling has just set; it should not jiggle or look wet.
- Let cool for 30 minutes at room temperature before transferring to the refrigerator. Chill for at least 3 hours.
- Top with fresh berries and small mint leaves. Enjoy!