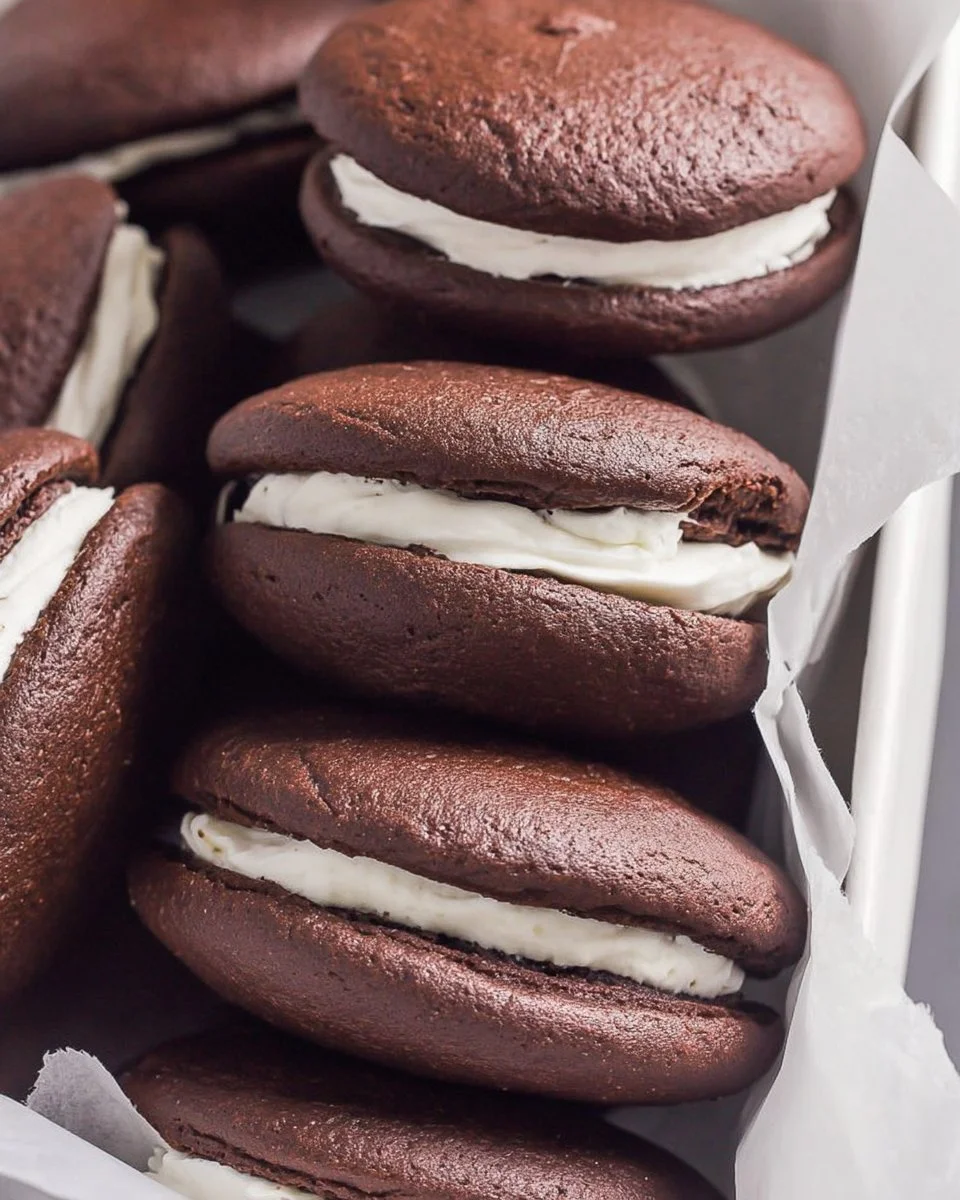
Who doesn’t love a delightful treat that captures the essence of indulgence? Picture this: two soft, cake-like cookies sandwiching a fluffy filling that melts in your mouth. That’s the magic of a cherished classic—one that has graced family picnics and birthday parties alike. These sweet wonders not only boast a rich chocolate flavor but also offer a satisfyingly tender bite that brings back memories of childhood comforts. Whether you’re looking to impress at a gathering or simply treat yourself, you’ll find that these delightful confections are as fun to make as they are to eat. They invite creativity and customization, making them ideal for any occasion. So gather your ingredients, roll up your sleeves, and let’s dive into creating a batch of irresistible goodies that will have everyone asking for seconds!
Why You’ll Love This Recipe
This recipe for whoopie pies is special not only because of its rich flavor combinations but also due to its simplicity, making it a fun project for bakers of all skill levels. With soft, chocolatey cakes and a luscious, creamy filling, every bite is a balance of textures that’ll leave you craving more. Their nostalgic appeal makes them a perfect fit for gatherings and celebrations, whether it’s a birthday party, potluck, or cozy evening at home. Plus, the thrill of assembling these sweet treats adds an extra layer of joy to your baking process. They can be tailored to suit different flavor profiles, ensuring that you can create your favorite version every time. Dive in and experience the sweetness—a homemade delight that is bound to impress!
What Makes This Recipe Special
The secret behind these whoopie pies lies not just in their irresistible taste but also in the contrasting textures that make every bite a slender layer of pleasure. The tender chocolate cookies are soft and moist, creating a perfect foundation for the creamy filling that lies between them. Using marshmallow creme yields an airy texture, making these desserts feel light despite their rich flavor. The combination of both granulated and brown sugar brings a depth of sweetness, balancing out the chocolate’s bitterness for a flavorful profile that satisfies. This recipe also allows for great creativity—feel free to experiment with various fillings or even add flavors to the cake batter for a unique twist. Each batch is a canvas, offering endless possibilities for personalization.
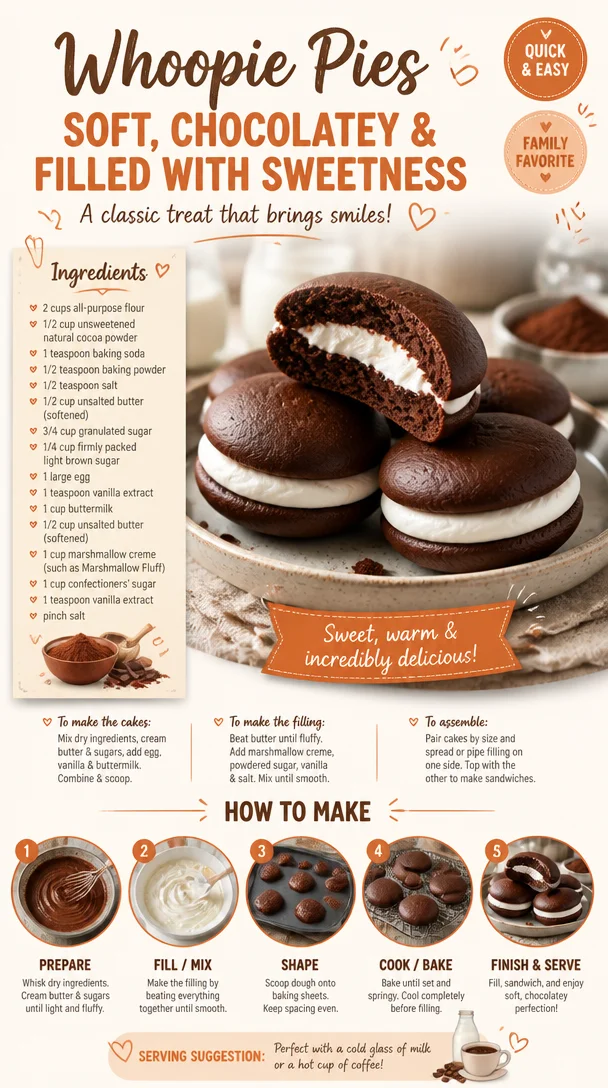
Ingredients
all-purpose flour: Provides the structure for the cakes, ensuring they hold their shape.
unsweetened natural cocoa powder: Delivers deep chocolate flavor, enriching the overall taste profile.
baking soda: Helps the cakes rise, creating a light and airy texture.
baking powder: Works alongside baking soda for a perfect rise and fluffiness.
salt: Enhances flavors and balances the sweetness of the ingredients.
unsalted butter: Adds richness and moisture to the cake.
granulated sugar: Sweetens the batter, creating a desirable sweetness.
light brown sugar: Contributes a hint of caramel flavor due to its molasses content.
large egg: Binds the ingredients together and adds moisture.
vanilla extract: Introduces warmth and aromatic notes to the cakes.
buttermilk: Ensures tenderness and provides a slight tanginess to balance the sweetness.
unsalted butter: Gives a creamy texture to the filling and enhances flavor.
marshmallow crème: Creates a fluffy, sweet filling that perfectly complements the cakes.
confectioners’ sugar: Sweetens the filling and adjusts the texture to be creamy and spreadable.
vanilla extract: Adds an extra layer of flavor to the filling.
pinch of salt: Balances the sweetness, enhancing the overall flavor.
How to Make Whoopie Pies
STEP 1. Preheat the oven. Set your oven temperature to 350°F (175°C) to prepare for baking.
STEP 2. Prepare the baking sheets. Line two baking sheets with parchment paper to prevent sticking.
STEP 3. Mix dry ingredients. In a bowl, whisk together flour, cocoa powder, baking soda, baking powder, and salt until well combined.
STEP 4. Cream the butters and sugars. In another bowl, blend softened unsalted butter with granulated and brown sugars until light and fluffy.
STEP 5. Add the egg and vanilla. Beat in the egg and vanilla extract until fully incorporated.
STEP 6. Add the buttermilk. Gradually mix in buttermilk until evenly combined with the butter mixture.
STEP 7. Combine wet and dry mixtures. Gradually add the dry mixture to the wet ingredients, mixing just until smooth and fully incorporated.
STEP 8. Drop batter onto baking sheets. Use a spoon or cookie scoop to drop dollops of batter onto the prepared sheets, leaving space between each for spreading.
STEP 9. Bake the cakes. Place in the preheated oven and bake for about 10-12 minutes, or until the tops spring back when lightly pressed.
STEP 10. Cool the cakes. Remove from the oven and allow the cakes to cool on the sheets for a few minutes before transferring to wire racks to cool completely.
STEP 11. Prepare the filling. In a bowl, beat the softened butter until creamy, then add marshmallow crème, confectioners’ sugar, vanilla extract, and salt, mixing until smooth.
STEP 12. Assemble the whoopie pies. Spread or pipe filling onto the flat side of one cooled cake and sandwich it with another cake, flat sides together.

Pro Tips
To enhance your whoopie pie-making experience, consider the following tips. Always ensure your butter is at room temperature for better creaming, which leads to a fluffier texture. When mixing the filling, use an electric mixer for maximum creaminess and incorporation. Experimenting with different cake flavors like vanilla or red velvet can add a delightful twist to the classic chocolate version. Consider chilling the assembled pies in the refrigerator for about 30 minutes; this allows the flavors to meld beautifully and ensures that the filling holds together when bitten into. Lastly, for beautiful presentation, sift a bit of confectioners’ sugar over the tops just before serving.
Common Mistakes to Avoid
Many novice bakers encounter common pitfalls when making whoopie pies. One of the most frequent mistakes is overmixing the batter, which can lead to dense cakes. Remember, mix just until the dry ingredients are incorporated. Another issue can arise from using cold ingredients; always ensure that your butter and egg are at room temperature to achieve that perfect creamy texture. Don’t overcrowd the baking sheets; giving each dollop enough space helps the cakes spread evenly while baking. If your pies turn out too sweet, consider reducing the amount of confectioners’ sugar in the filling slightly; fewer sweets can balance the overall flavor. Finally, allow the cakes to cool completely before assembling; this prevents the filling from melting and ensures a satisfying structure when you take a bite.
Variations
• Replace the cocoa powder with peanut butter for a nutty twist.
• Add a dash of espresso powder to enhance the chocolate flavor.
• Fill with a fruit-flavored frosting for a refreshing change.
• Swap out marshmallow crème for whipped cream for a lighter filling.
• Experiment with flavored extracts like mint or almond for a unique twist.
Serving Ideas
Pair your whoopie pies with a scoop of vanilla ice cream for a delightful dessert sundae. They’re also perfect alongside a steaming cup of coffee or hot chocolate, making for a cozy snack option. Serve them at birthday parties or festive gatherings to impress guests with a nostalgic treat. Consider stacking two whoopie pies and drizzling them with chocolate or caramel sauce for an eye-catching presentation. On a summer day, they make a refreshing treat when served chilled from the refrigerator.
Meal Prep & Storage
Whoopie pies can be prepared in advance, making them a convenient option for meal prep or special occasions. You can bake the cake components ahead of time and store them in an airtight container at room temperature for up to three days. If you need to extend their shelf life, consider freezing the cakes without filling. Before serving, simply defrost and fill them with the creamy filling. Assembled whoopie pies can be stored sealed in the fridge for up to five days, though they are best enjoyed within a couple of days for optimal freshness.
FAQs
Can I make whoopie pies with gluten-free flour?
Absolutely! Substitute all-purpose flour with a 1:1 gluten-free baking mix for delicious gluten-free whoopie pies.
How should I store leftovers?
Store any remaining whoopie pies in an airtight container in the refrigerator for up to five days.
Can I make the filling ahead of time?
Yes, you can prepare the filling a day earlier. Just store it in the refrigerator in an airtight container until you’re ready to use it.
What can I do if the cakes spread too much while baking?
Make sure not to over-mix the batter and ensure your baking sheets are adequately spaced to allow for spreading during baking.
Can I freeze whoopie pies?
Yes, you can freeze them without the filling. Assemble them after thawing for the best texture.
Conclusion
These sweet sandwiches are more than just a dessert; they are a delicious nod to nostalgia, comforting and inviting. With every bite, you’re not just enjoying a treat but also the memories and love that come with it. Perfect for sharing or savoring alone, this recipe promises satisfaction that goes beyond the kitchen. So get ready to enjoy whoopie pies, a timeless delight that sure brings joy to any occasion!

Whoopie Pies
Ingredients
Method
- Preheat the oven to 350°F (175°C).
- Line two baking sheets with parchment paper.
- In a bowl, whisk together flour, cocoa powder, baking soda, baking powder, and salt.
- In another bowl, blend softened butter with granulated and brown sugars until light and fluffy.
- Beat in the egg and vanilla extract until fully incorporated.
- Gradually mix in buttermilk until evenly combined.
- Gradually add the dry mixture to the wet ingredients, mixing just until smooth.
- Use a spoon or cookie scoop to drop dollops of batter onto the prepared sheets.
- Bake for about 10-12 minutes, or until the tops spring back when pressed.
- Allow the cakes to cool on the sheets for a few minutes before transferring to wire racks.
- In a bowl, beat the softened butter until creamy.
- Add marshmallow crème, confectioners’ sugar, vanilla extract, and salt to the bowl, mixing until smooth.
- Spread or pipe filling onto the flat side of one cooled cake and sandwich it with another cake.