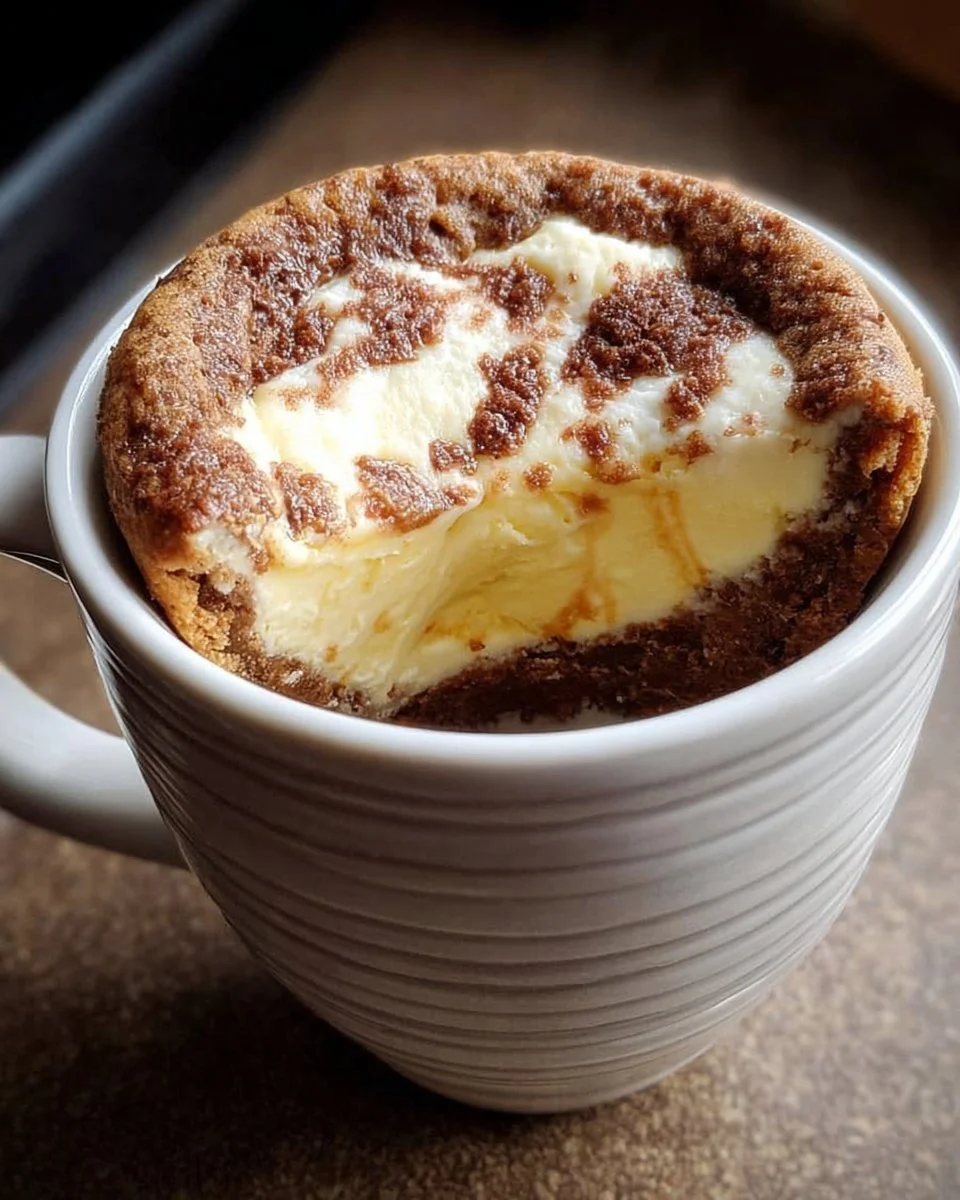
Decadent Cheesecake in a Mug
Baking a cheesy dessert can sometimes feel like a daunting task, especially when you’re juggling a busy family life. Don’t let kitchen frustration hold you back from enjoying a sweet treat! Imagine having all the flavors of a rich cheesecake without the hassle of a full-sized cake. This Decadent Cheesecake in a Mug is your solution — delivering indulgence in a single serving, perfect for satisfying late-night cravings or as a quick dessert after dinner. Plus, it’s a protein-packed alternative to traditional sweet treats, allowing you to indulge while staying conscious of your nutrition goals.
Kitchen Frustration That Makes This Recipe a Lifesaver
We’ve all been there: you finish a long day, and the last thing you want to do is sift through endless recipes or bake for hours. Whether it’s managing family dinners or trying to stick to your meal plan, there can be a constant struggle to satisfy everyone’s sweet tooth without resorting to store-bought cookies or pies. This is where our Decadent Cheesecake in a Mug shines. It offers a delightful, creamy cheesecake experience in minutes, making it a lifesaver for busy homes.
With just a few simple ingredients and a microwave, you can enjoy a comforting treat without breaking the bank or your routine. Need something to uplift your mood and provide a touch of nostalgia? This recipe is not just quick, but it also tugs at those heartstrings, reminding you of cherished moments spent enjoying dessert with family and friends. Here’s a practical tip: double the ingredients and make two servings if you’re feeling generous, or if you’re just really craving it!
Why This Decadent Cheesecake in a Mug Works So Well
Quick Answer: This cheesecake in a mug takes just a few minutes to prepare and is a perfect single-serving dessert that satisfies while fitting into your calorie-conscious lifestyle.
The magic of this Decadent Cheesecake in a Mug lies in its creamy texture and rich flavor. It combines the classic flavors of a traditional cheesecake without the need for baking, bringing you a portion-controlled sweet treat. Each spoonful offers a delightful blend of cream cheese and buttery graham cracker, making it not only flavorful but also incredibly satisfying.
With just a microwave and minimal ingredients, it’s a time-saver on busy weeknights. If you’re trying to stick to your nutrition goals, this cheesecake is a macro-balanced indulgence that still feels like a guilty pleasure. Designed for the health-conscious, this decadent treatment proves that you can enjoy dessert without compromising on your wellness journey.
Ingredients, Substitutions & Foolproof Tips
- 1/4 cup cream cheese, softened: Provides that creamy texture characteristic of cheesecake.
- 1 tablespoon granulated sugar: Sweetens the mix beautifully. You can substitute with a sugar alternative if desired.
- 1/2 teaspoon vanilla extract: Adds a lovely depth of flavor.
- 1 large egg yolk: Helps bind the ingredients and adds a rich texture.
- 1 tablespoon heavy cream or sour cream: Both options create extra creaminess; choose depending on your preference.
- 1 tablespoon graham cracker crumbs (for crust): Brings the classic cheesecake flavor; try using a gluten-free option if needed.
- 1 teaspoon melted butter (for crust): Binds the crumbs and adds a nice richness.
Step-by-Step Directions
- Prepare the Mug: Lightly grease a standard microwave-safe mug to prevent the cheesecake from sticking. A non-stick spray or a little butter works perfectly.
- Make the Crust: In a small bowl, mix the graham cracker crumbs and melted butter until combined. Press this mixture evenly into the bottom of the prepared mug to form a crust layer.
- Mix the Filling: In a separate small bowl, beat the softened cream cheese until smooth and creamy.
- Add Sweetness & Flavor: Add the granulated sugar and vanilla extract to the cream cheese, mixing until well incorporated.
- Incorporate the Egg Yolk: Beat in the egg yolk until the mixture is uniformly creamy and smooth.
- Stir in the Cream: Gently stir in the heavy cream or sour cream with a spatula until you have a cohesive cheesecake batter.
- Pour the Batter: Pour the cheesecake batter over the crust layer in the mug, ensuring even distribution.
- Microwave: Microwave on 50% power for 45 seconds. Check for doneness; the edges should look set but the center should still wobble slightly.
- Adjust Cooking Time: If the center is still very liquid, microwave in additional 10-second bursts at 50% power until mostly set; be careful not to overcook.
- Cool & Serve: Let the cheesecake cool in the mug for 5 minutes before enjoying.
Common Mistakes to Avoid & Pro Tips
- Mistake: Overcooking the Cheesecake: Microwaving too long can lead to rubbery texture.
- Solution: Always check your cheesecake after 45 seconds and use subsequent bursts of 10 seconds for adjustments.
- Mistake: Using Cold Ingredients: If your cream cheese is cold, it won’t blend smoothly.
- Solution: Let it soften to room temperature before mixing.
- Pro Tip: Experiment with different flavors by adding cocoa powder or lemon zest to the cheesecake filling for a fresh twist.
- Pro Tip: For added indulgence, top your cheesecake with fresh berries, a drizzle of chocolate, or a dollop of whipped cream before serving.
Serving, Storage & Freezer Guide
How to Serve Decadent Cheesecake in a Mug
Enjoy your cheesecake right from the mug for a comforting, personal dessert experience. For an elevated presentation, consider transferring the cooled cheesecake to a small dessert plate. Garnish with seasonal berries or a sprinkle of powdered sugar for a touch of elegance that’s perfect for family gatherings or dinner parties.
How to Store Decadent Cheesecake in a Mug
If you have leftovers (though it’s hard to imagine!), cover the mug tightly with plastic wrap or transfer the cheesecake to an airtight container. Store it in the refrigerator for up to three days.
Can You Freeze Decadent Cheesecake in a Mug?
Yes, you can freeze the Decadent Cheesecake in a Mug! Allow it to cool completely, then cover the mug tightly with plastic wrap and place it in the freezer for up to one month. When ready to enjoy, thaw it in the refrigerator overnight before reheating gently in the microwave.
Frequently Asked Questions
Can I use a whole egg instead of just the yolk?
Using a whole egg will work, but it may alter the texture slightly, making it less creamy.
What can I use instead of cream cheese?
If you’re looking for a lighter option, cottage cheese or Greek yogurt can work, but they will change the texture and flavor a bit.
Is there a way to make this cheesecake low-sugar?
You can easily substitute the granulated sugar with a sugar alternative like erythritol or stevia for a low-sugar version.
Can kids make this recipe?
Absolutely! This recipe is simple enough for older kids to follow with some supervision, making it a fun family activity.
Conclusion
The Decadent Cheesecake in a Mug is not just a quick dessert; it’s a delightful escape from the everyday hustle, perfectly portioned for one. It combines convenience with nostalgia, allowing you to indulge in a creamy, sweet treat without the guilt.
If this recipe reminds you of someone you love, share it with them. Your memories keep recipes alive.

Decadent Cheesecake in a Mug
Ingredients
Method
- Lightly grease a standard microwave-safe mug to prevent the cheesecake from sticking.
- In a small bowl, mix the graham cracker crumbs and melted butter until combined. Press this mixture evenly into the bottom of the prepared mug to form a crust layer.
- In a separate small bowl, beat the softened cream cheese until smooth and creamy.
- Add the granulated sugar and vanilla extract to the cream cheese, mixing until well incorporated.
- Beat in the egg yolk until the mixture is uniformly creamy and smooth.
- Gently stir in the heavy cream or sour cream with a spatula until you have a cohesive cheesecake batter.
- Pour the cheesecake batter over the crust layer in the mug, ensuring even distribution.
- Microwave on 50% power for 45 seconds. Check for doneness; the edges should look set, but the center should still wobble slightly.
- If the center is still very liquid, microwave in additional 10-second bursts at 50% power until mostly set; be careful not to overcook.
- Let the cheesecake cool in the mug for 5 minutes before enjoying.