Homemade Sourdough Bread, Step by Step
There’s something profoundly satisfying about creating your own homemade sourdough bread from scratch. The aroma wafting through your kitchen as it bakes is simply irresistible. With its crusty exterior and soft, chewy interior, sourdough embodies the perfect combination of flavors and textures that elevate any meal. Plus, this classic bread not only makes for fabulous sandwiches but also stands beautifully on its own, fresh from the oven.
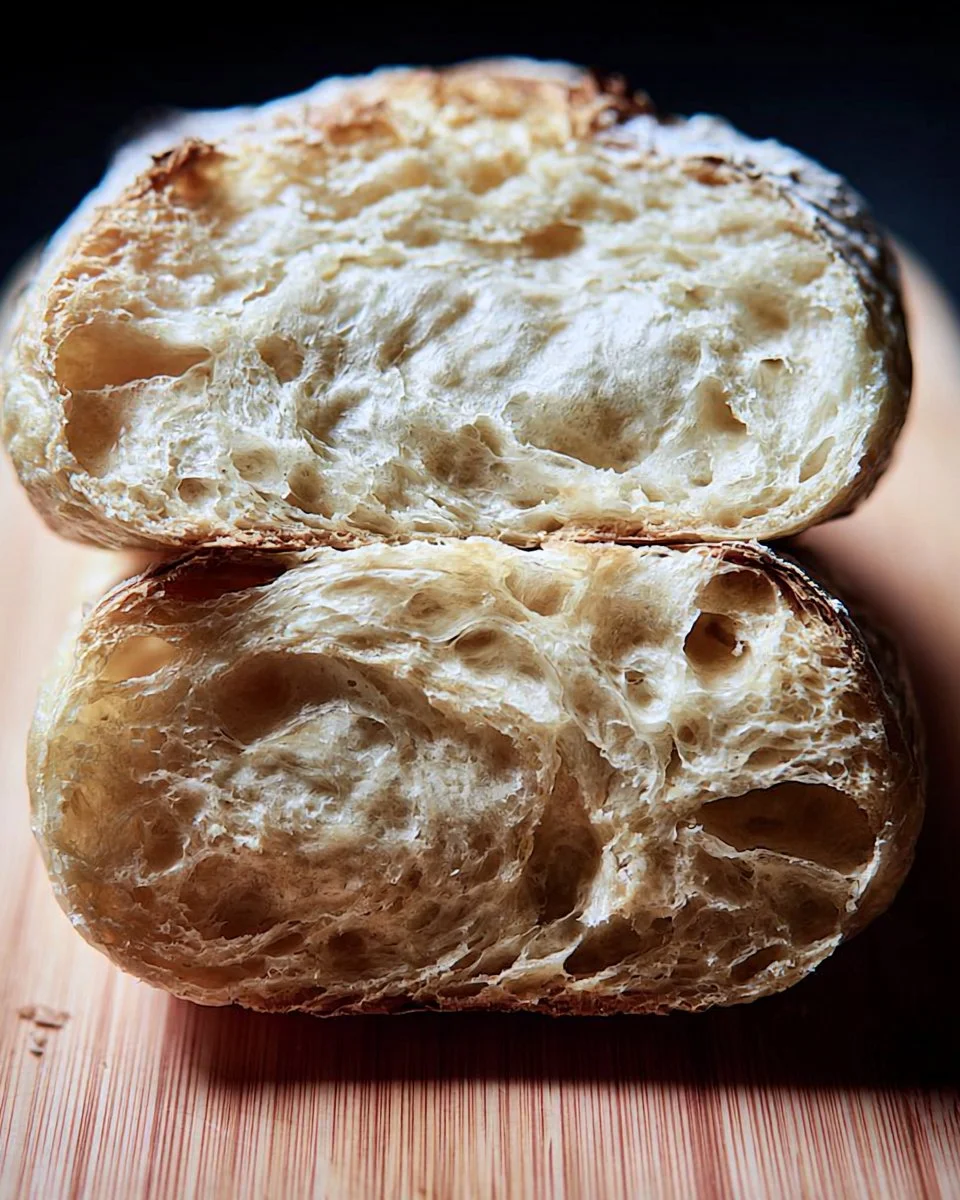
Imagine slicing into freshly baked sourdough, the crust crackling under the knife, and the warm steam escaping, revealing a network of airy crumbs beneath. Whether you enjoy it with just a smear of butter or transformed into gourmet avocado toast, this bread brings comfort and joy to your table. Best of all, mastering sourdough baking can be a memorable journey, enriching your culinary skills.
Quick Answer
This homemade sourdough bread recipe guides you step-by-step to create a delicious loaf with a crispy crust. Perfectly fermented dough results in airy texture and unbeatable flavor.
Why You’ll Love This Recipe
This sourdough bread recipe is a must-try for a multitude of reasons:
- Flavorful: The natural fermentation process develops a deep, tangy flavor profile.
- Versatile: Enjoy it fresh, toasted, or as the base for countless recipes.
- Healthier alternative: Sourdough is easier to digest due to the fermentation process.
- Easy technique: With a bit of patience, you can achieve bakery-quality bread at home.
- Customizable: Adjust the proofing time and flour type for unique results every time!
What Makes This Recipe Special
This sourdough bread recipe stands out thanks to its simplified process while still delivering exceptional results. The balance between the active starter, warm water, and high-quality bread flour creates a perfect environment for fermentation. During the multiple folding phases, you develop gluten structure, which is crucial for achieving that airy crumb and sturdy crust. Baking in a Dutch oven simulates the steam environment of professional ovens, allowing your loaf to spring up beautifully in the initial baking stage. Each of these elements contributes to a loaf of bread that is not only delicious but visually stunning.
Kitchen Tools You’ll Need
- Large mixing bowl – for combining ingredients and allowing the dough to rise.
- Baking Dutch oven – crucial for creating the right steam environment during baking.
- Bench scraper – helpful for shaping and moving the dough with ease.
- Digital scale – ensures accurate ingredient measurements for best results.
- Kitchen towel – used to cover the dough while it rises to prevent drying.
Ingredients
bubbly, active starter: Provides the wild yeast necessary for fermentation and leavening the bread.
warm water: Activates the yeast and helps to hydrate the dough for better texture.
bread flour: Offers high protein content for strong gluten formation, resulting in a chewy structure.
fine sea salt: Enhances flavor while regulating yeast activity during fermentation.
Ready to cook? Scroll to the recipe card below for exact measurements.
How to Make Homemade Sourdough Bread, Step by Step
STEP 1. Mix the Starter and Water. Whisk the starter and water together in a large bowl with a fork or spatula.
STEP 2. Add Flour and Salt. Add the flour and salt. Mix to combine, finishing by hand if necessary to form a rough dough.
STEP 3. Cover and Rest. Cover with a damp towel and let rest for 30 minutes.
STEP 4. Stretch and Fold. After 30 minutes, grab a corner of the dough and pull it up and into the center. Repeat until you’ve performed this series of folds 4 to 5 times with the dough.
STEP 5. Rest Again. Let dough rest for another 30 minutes and repeat the stretching and folding action. If you have the time, do this twice more for a total of 4 times in 2 hours.
STEP 6. Cover and Rise. Cover the bowl with a towel and let rise at room temperature, about 8 to 10 hours at 70°F (21°C), until increased by 50% in volume.
STEP 7. Shape the Dough. Coax the dough onto a lightly floured surface. Gently shape it into a round by folding the top down to the center, turning the dough, and repeating until you’ve come full circle.
STEP 8. Rest Again. Let the dough rest seam side up for 30 minutes. Meanwhile, line an 8-inch bowl or proofing basket with a towel and dust with flour.
STEP 9. Final Shaping. Using a bench scraper, shape the dough again as described in step 7. Place the round into your lined bowl, seam side up.
STEP 10. Refrigerate. Cover the dough and refrigerate for 1 hour or for as long as 48 hours.
STEP 11. Preheat Oven. Place a Dutch oven in your oven, and preheat to 550°F (290°C). Cut a piece of parchment to fit the baking pot.
STEP 12. Score the Dough. Place the parchment over the dough and invert the bowl to release. Using a knife, score the dough as desired.
STEP 13. Bake Covered. Use the parchment to transfer the dough into the preheated baking pot. Lower the oven to 450°F (230°C) and bake for 30 minutes, covered.
STEP 14. Bake Uncovered. Remove the lid, lower the temperature to 400°F (200°C), and continue to bake for 10 to 15 minutes more.
STEP 15. Cool and Slice. Allow to cool on a wire rack for 1 hour before slicing. This loaf will stay fresh for up to 3 days in an airtight container.
Why This Recipe Works
The texture of sourdough bread is achieved through fermentation, which develops gluten and creates a chewy crumb. The natural acidity helps break down the flour, resulting in a tender interior. Layering flavors during fermentation adds depth, making each bite unique. Baking in a Dutch oven traps steam, giving a perfect rise and a golden, crusty exterior. The method capitalizes on simple ingredients to produce complex flavors and textures.
Pro Tips
To achieve the best results with your sourdough:
- Always use a bubbly, active starter for maximum leavening power.
- Adjust hydration levels based on your flour’s absorbency; add a bit more water if using whole wheat flour.
- Monitor dough rise visually rather than strictly by time for perfect fermentation.
- For enhanced flavor, consider a longer cold fermentation in the refrigerator.
- Practice shaping techniques to develop a tight surface on your loaf for better rise.
Common Mistakes to Avoid
Mistake: Not using an active starter.
Why it happens: A weak starter won’t leaven the bread effectively.
How to fix it: Always ensure your starter is bubbly and fed before use.
Mistake: Overproofing the dough.
Why it happens: Leaving the dough too long can cause it to collapse.
How to fix it: Pay attention to volume increase and bubbling rather than relying solely on time.
Mistake: Baking at too high a temperature initially.
Why it happens: High initial heat can result in burnt crust.
How to fix it: Start at a lower temperature and only raise it after the lid is removed.
Mistake: Incorrect shaping techniques.
Why it happens: Not creating enough tension in the dough can affect rise.
How to fix it: Practice the folding techniques to build surface tension.
Variations
- Use whole wheat flour for a nutty flavor and extra fiber.
- Add herbs or garlic for a fragrant twist.
- Incorporate seeds like sesame or pumpkin for added crunch.
- Experiment with olive oil for a richer texture and taste.
- Try different hydrations for a unique crumb structure.
Nutrition Highlights
| Nutrient | Role |
|---|---|
| Protein | Helps support satiety and balanced meals. |
| Fiber | Supports digestive health and adds fullness. |
| Complex carbohydrates | Provides sustained energy release. |
Serving Ideas
This sourdough bread pairs wonderfully with soups and salads or makes a perfect base for hearty sandwiches. Consider topping slices with smashed avocado and poached eggs for a delicious brunch or serving alongside a charcuterie board filled with meats and cheeses. The possibilities are endless with this versatile bread!
Best Occasions for This Recipe
Homemade sourdough bread shines at family gatherings, picnics, or cozy dinners with friends. It’s perfect for holidays or any special event when you want to impress your guests with fresh-baked goodness. Enjoying the simple pleasure of freshly baked bread at home is also a wonderful way to elevate your daily meals.
Meal Prep & Storage
Meal Prep
This recipe allows you to prepare the dough ahead of time and refrigerate, which enhances the flavor. Consider making two loaves at once to enjoy one fresh and freeze the other for later!
Refrigeration
Keep your sourdough bread in an airtight container at room temperature for up to three days to maintain its freshness. Avoid refrigerating, as this can dry it out.
Freezing
Sourdough freezes beautifully. Slice the loaf, place slices in a freezer-safe bag, and store for up to three months. To revive, simply pop slices in the toaster or let thaw at room temperature.
Reheating
If your bread has been frozen, gently toast it or warm it in the oven for a few minutes at a low temperature to restore its crunchy crust and soft interior.
FAQs
How long can I store homemade sourdough bread?
Homemade sourdough can stay fresh for up to three days at room temperature in an airtight container.
Can I use all-purpose flour instead of bread flour?
Yes, but using bread flour will yield a better texture due to its higher protein content.
What if my dough doesn’t rise?
If your dough hasn’t risen, your starter may not be active enough—ensure to use a bubbly and well-fed starter.
Can I bake sourdough without a Dutch oven?
It is recommended, but you can use a baking stone and create steam in the oven with a pan of water.
Can I add seeds or herbs to my sourdough?
Absolutely! You can incorporate seeds, herbs, or other add-ins during the mixing stage for extra flavor and texture.
Save This Recipe for Later
If you can’t make it today, make sure to save this recipe so you can easily find it later. Your future self will thank you!
Conclusion
Making sourdough bread at home is not just a baking project; it’s a rewarding experience. The process teaches you patience and skill while yielding a delicious result that your whole family will enjoy. The next time you’re looking for a comforting addition to your meals, remember that homemade sourdough is just a few steps away. Happy baking!